Configure Facebook as a Federated Authenticator
This page guides you through configuring Facebook as a federated authenticator in MWARE IAM.
Follow the steps given below to configure MWARE IAM to authenticate users using their Facebook credentials.
Create a Facebook app
Note
You can skip this section if you have already registered your application on Facebook.
-
Log in to the Facebook developer portal and click Create App.
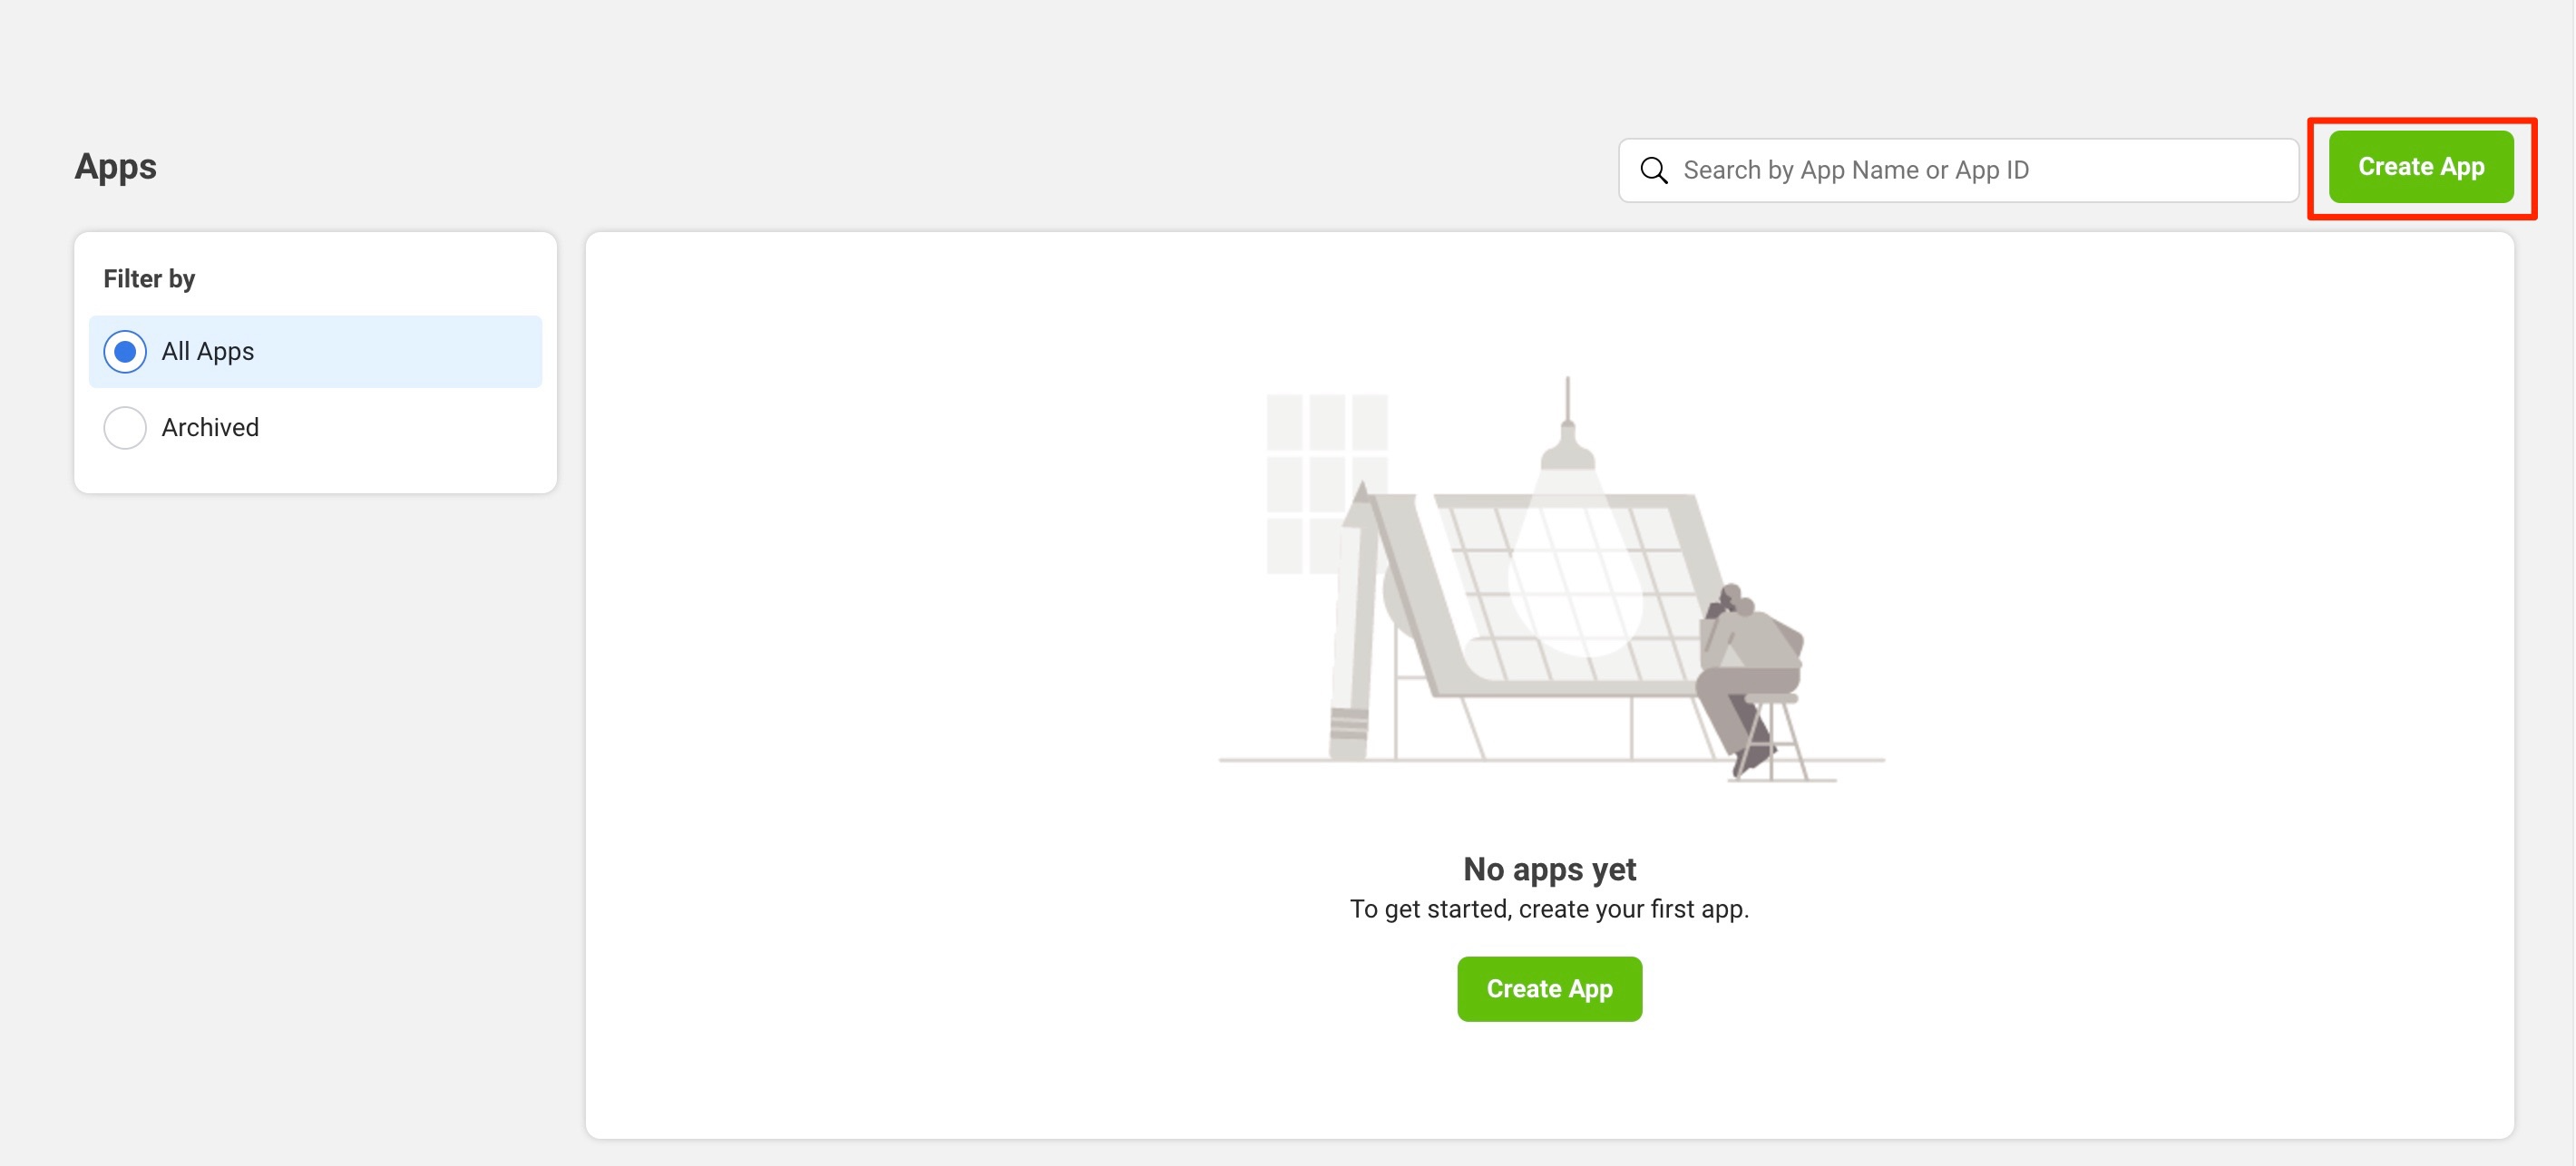
-
Select Consumer as the app type and click Next
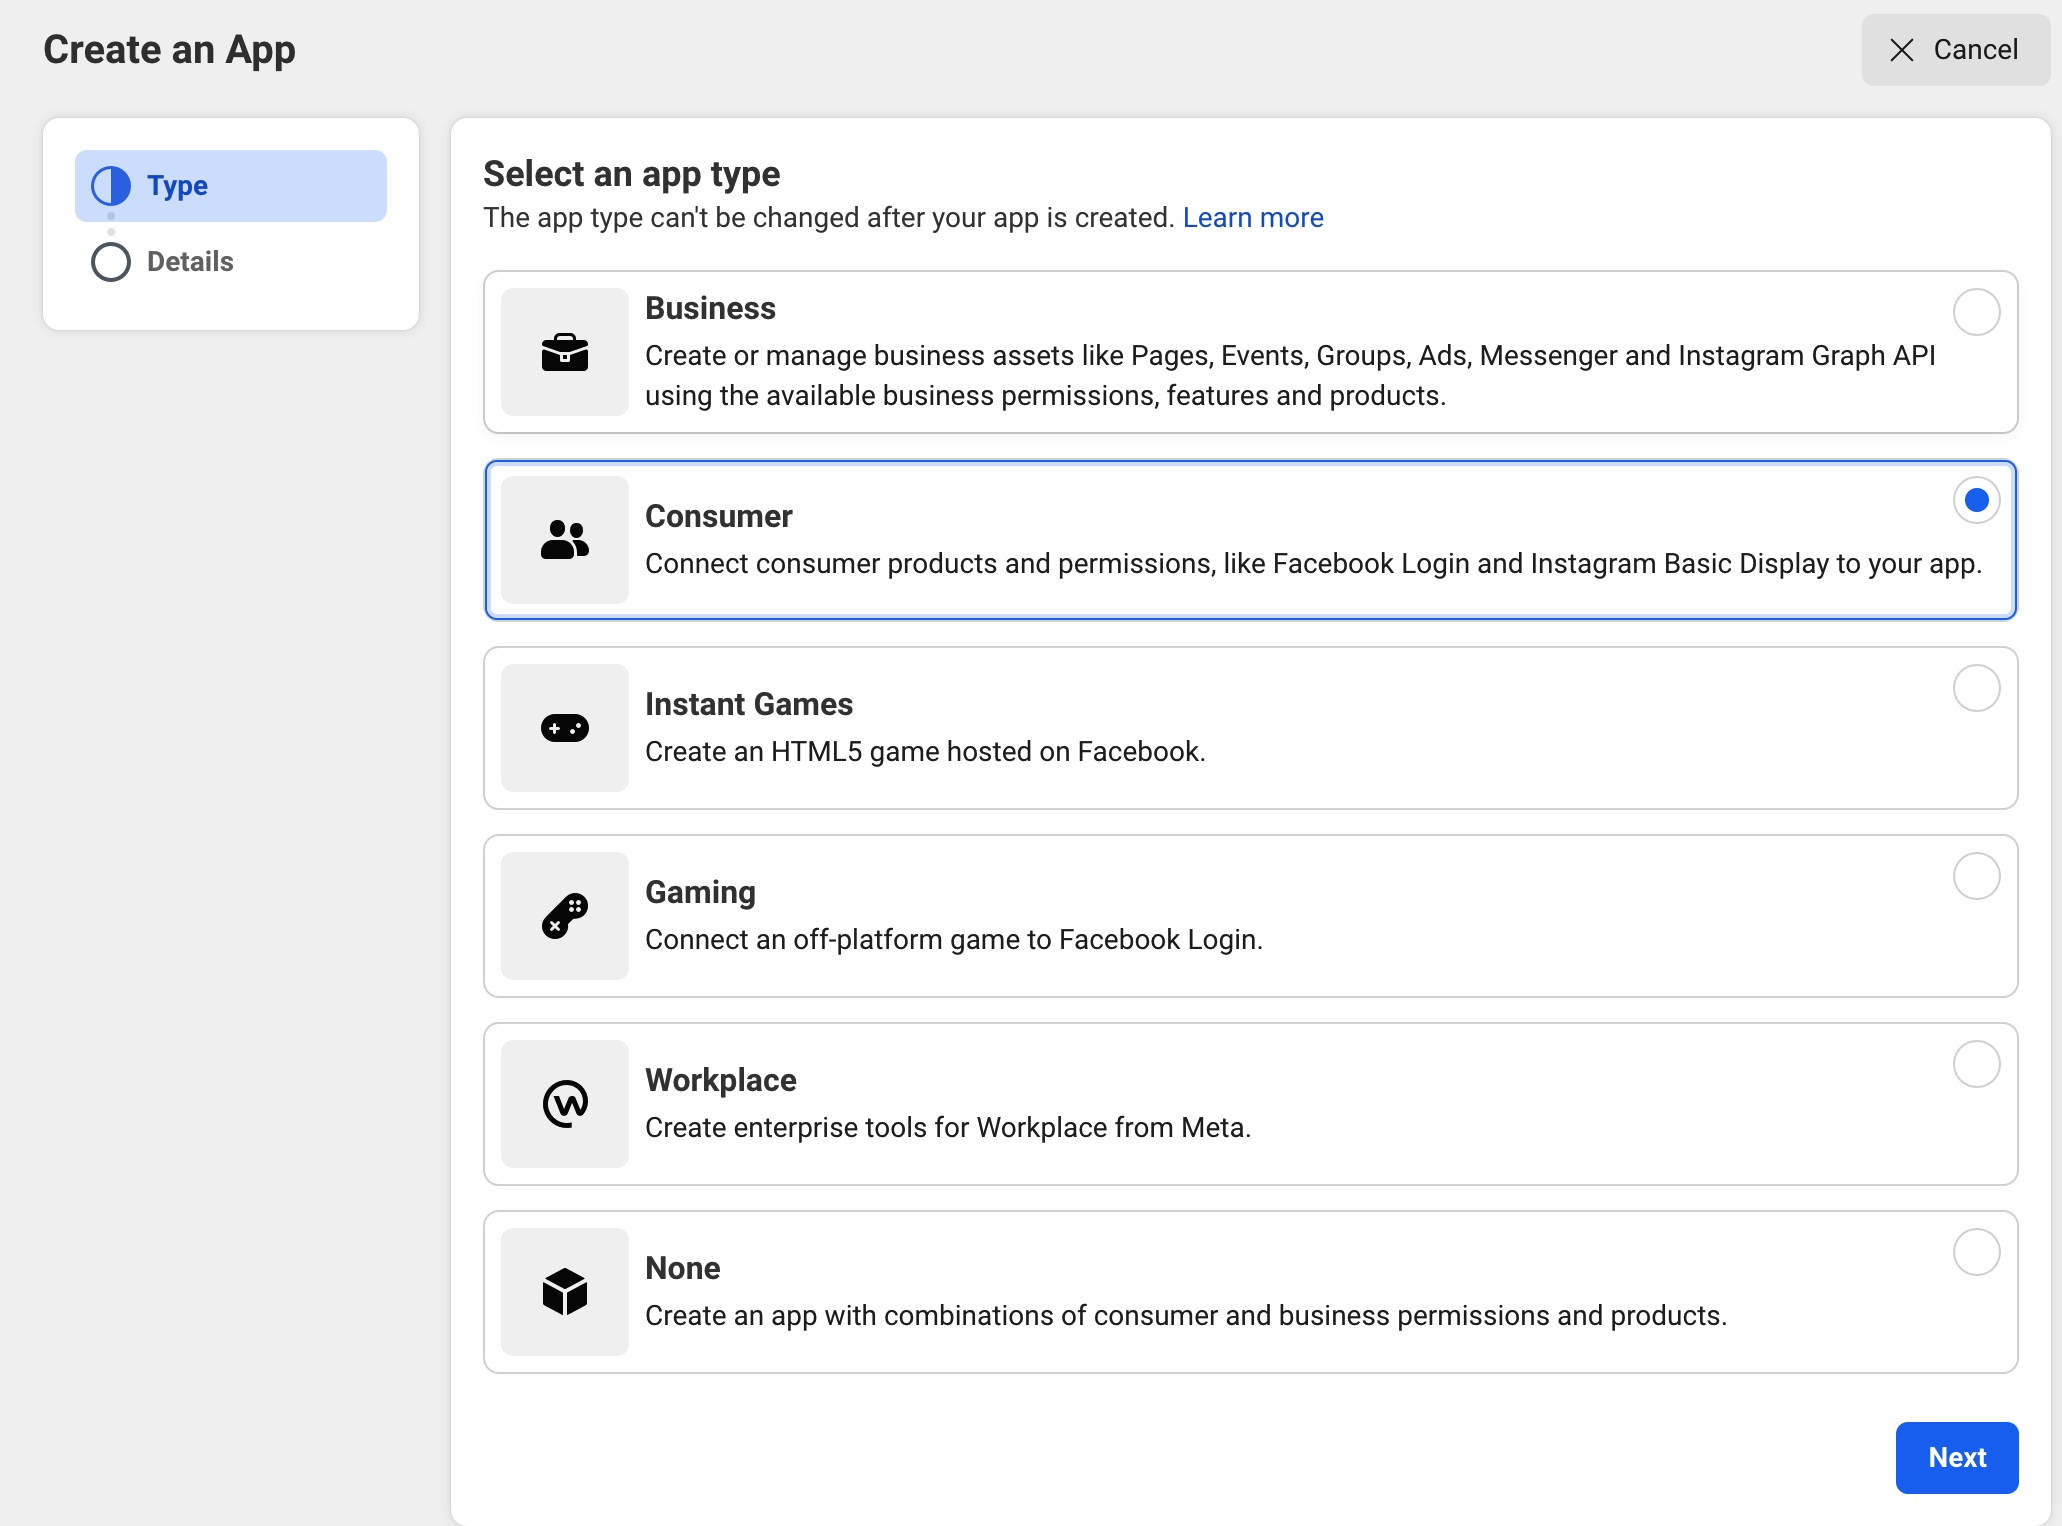
-
Provide Display Name and click Create App to create an application.
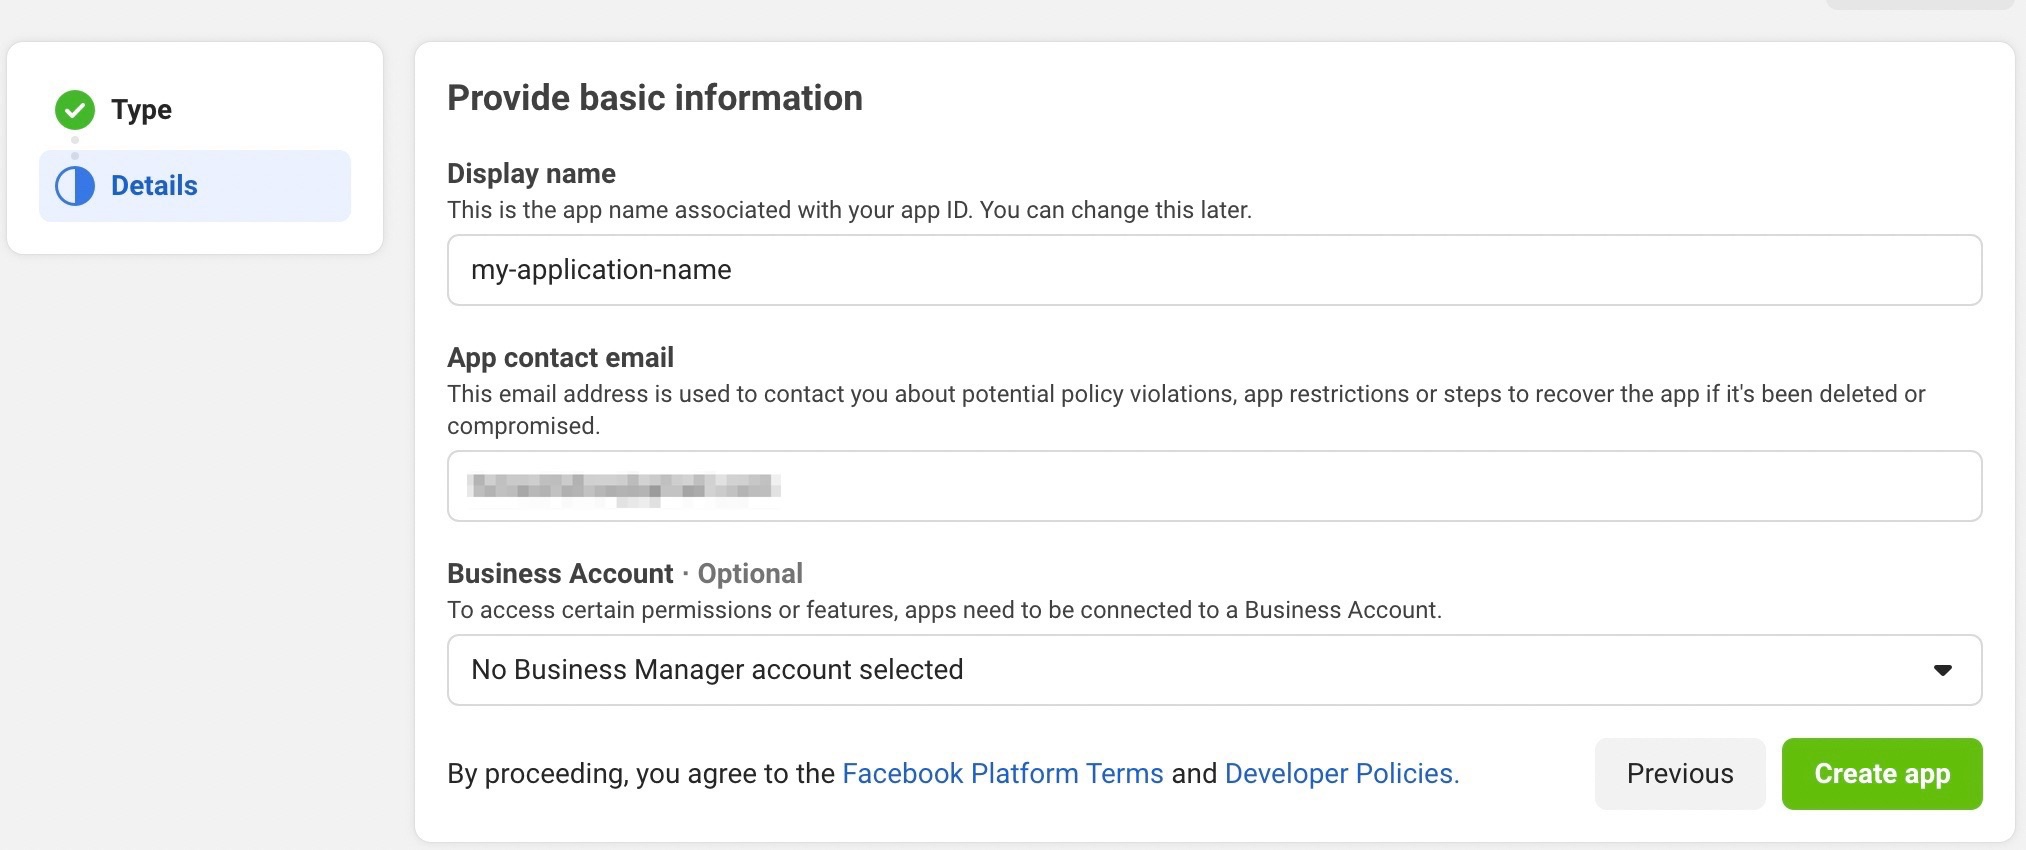
-
Under Add products to your app, click Set up on the Facebook Login card.
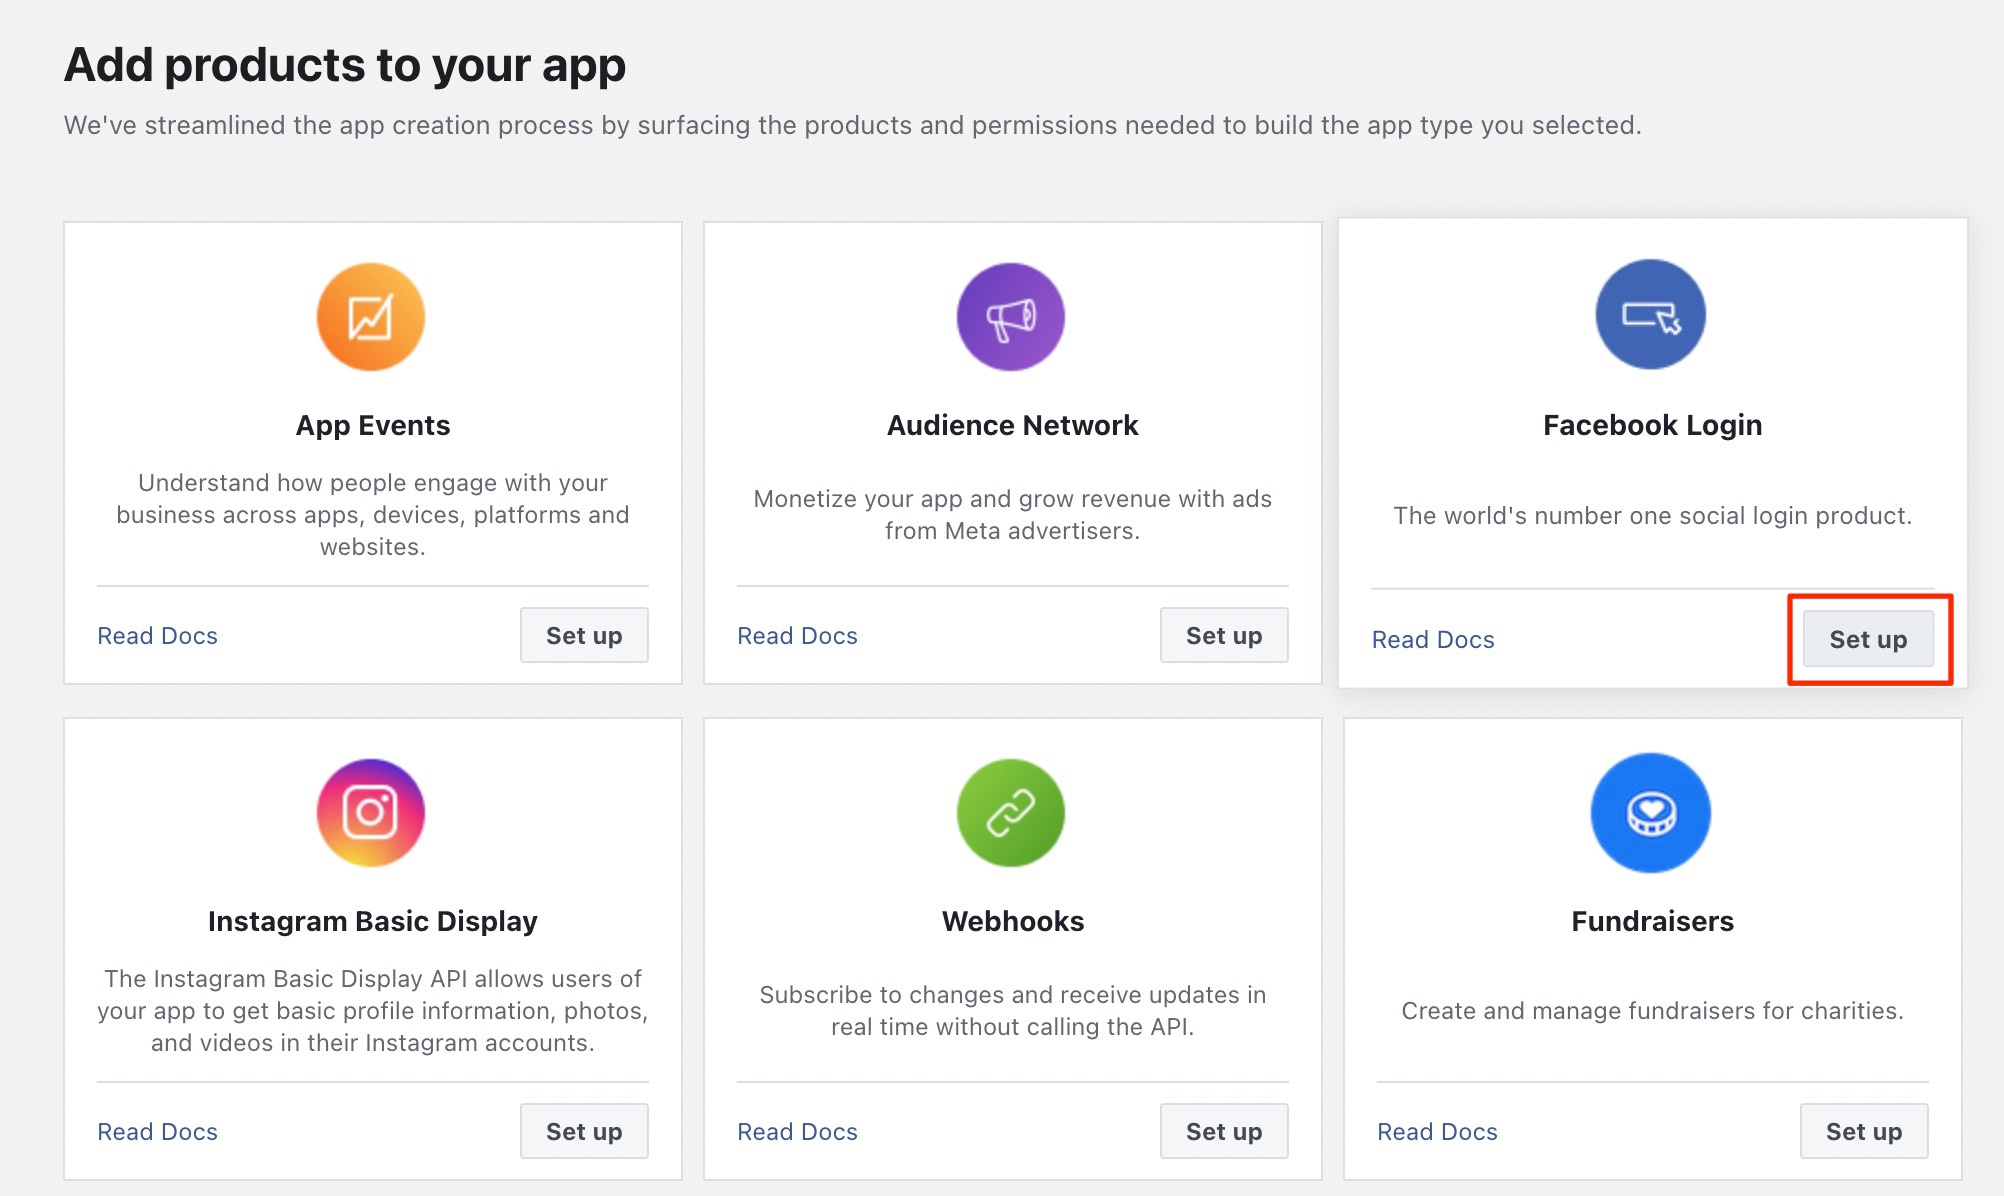
-
Select Web type.
-
Enter
https://<IS_HOST>:<IS_PORT>/as the Site URL and click Save.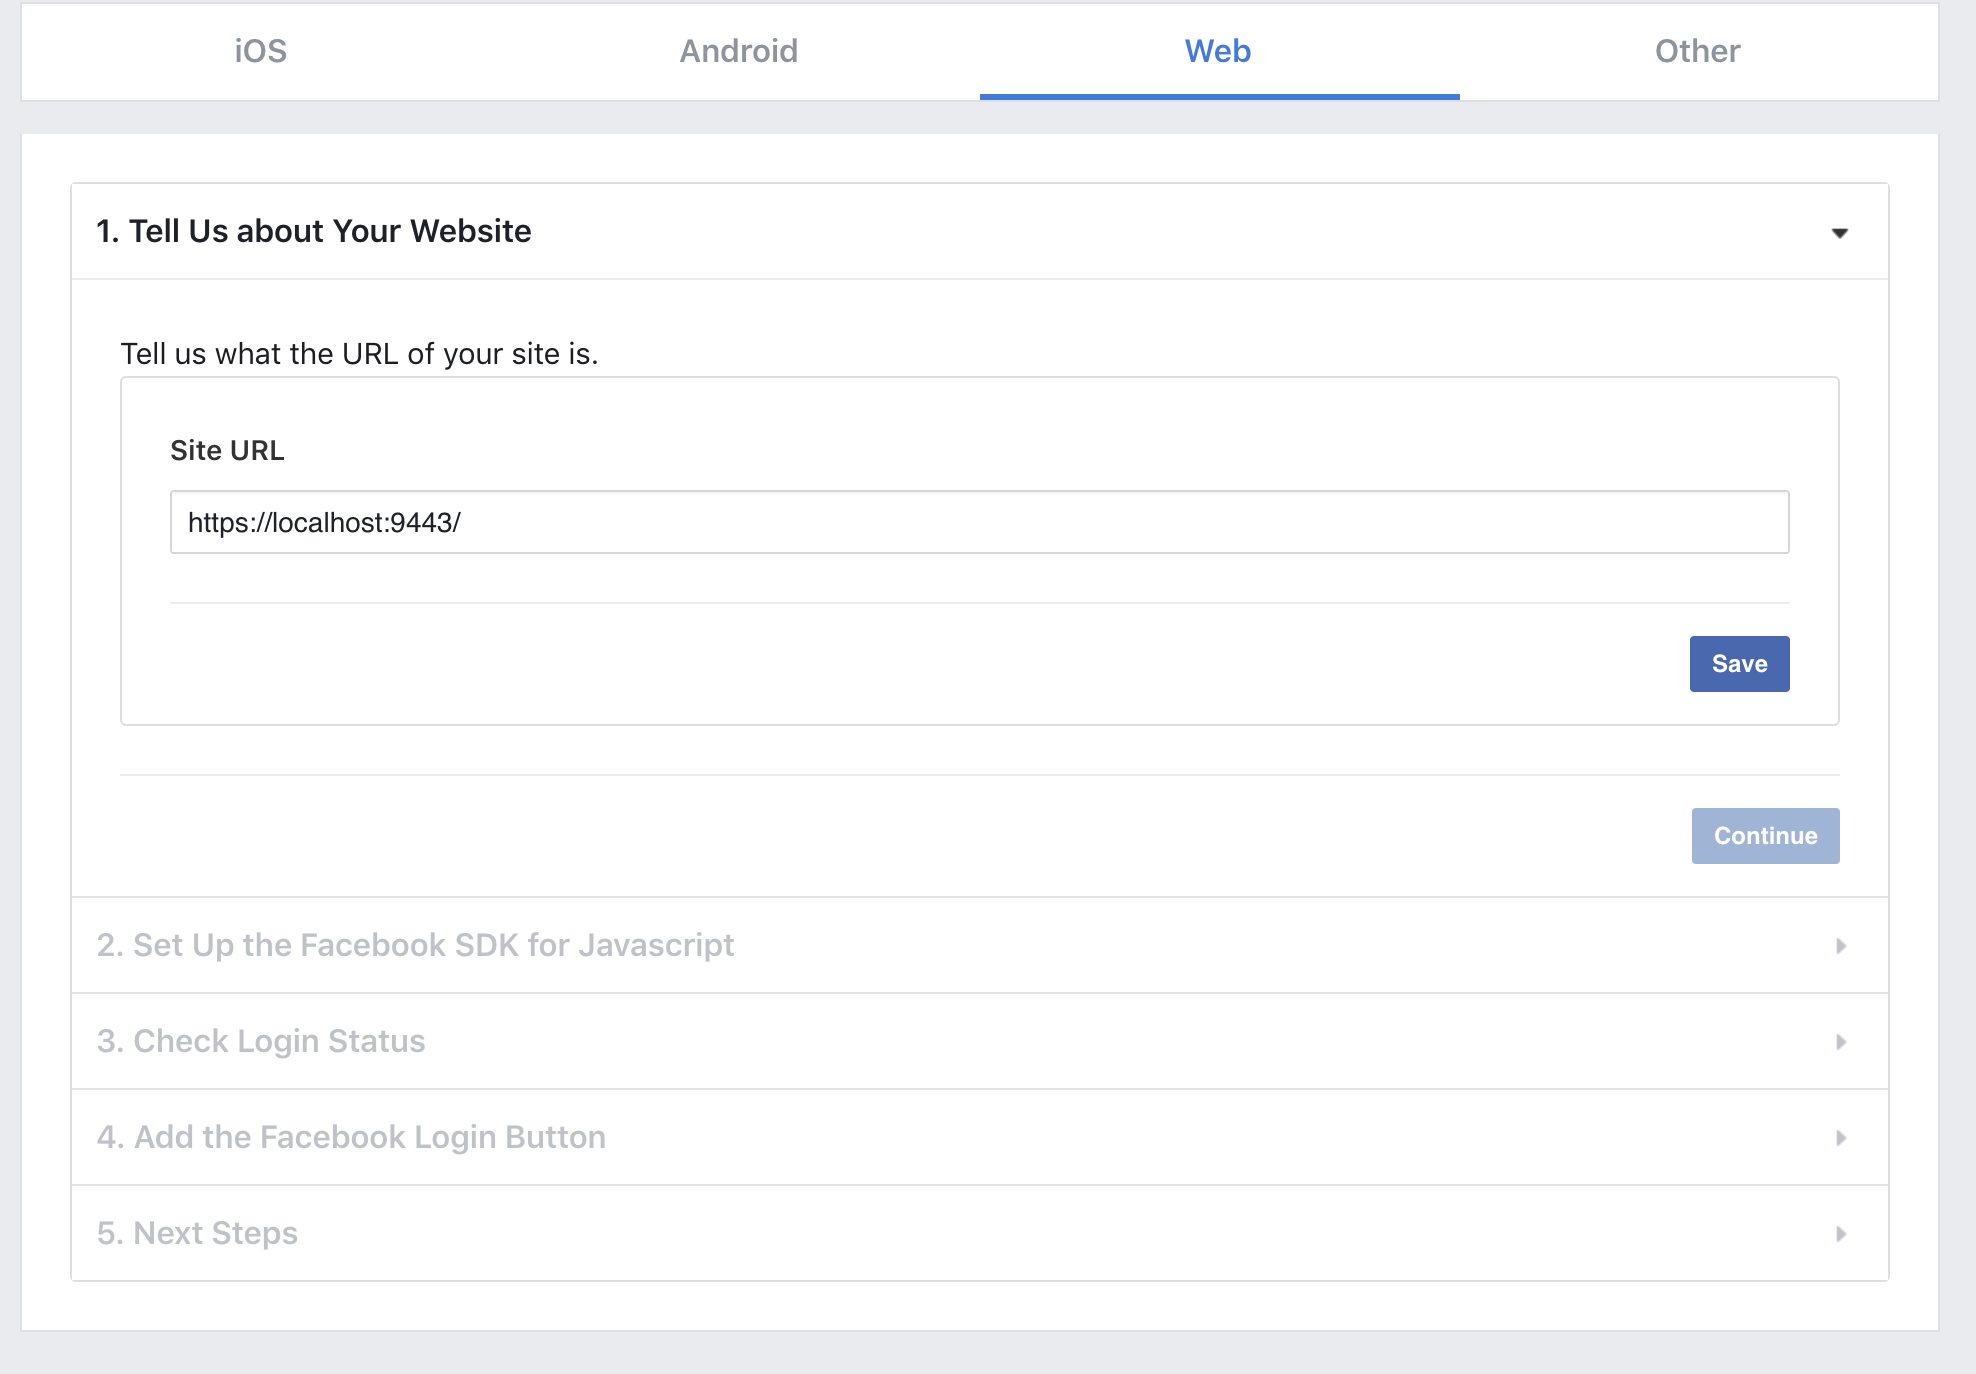
-
On the left panel, under Facebook Login, go to Settings.
-
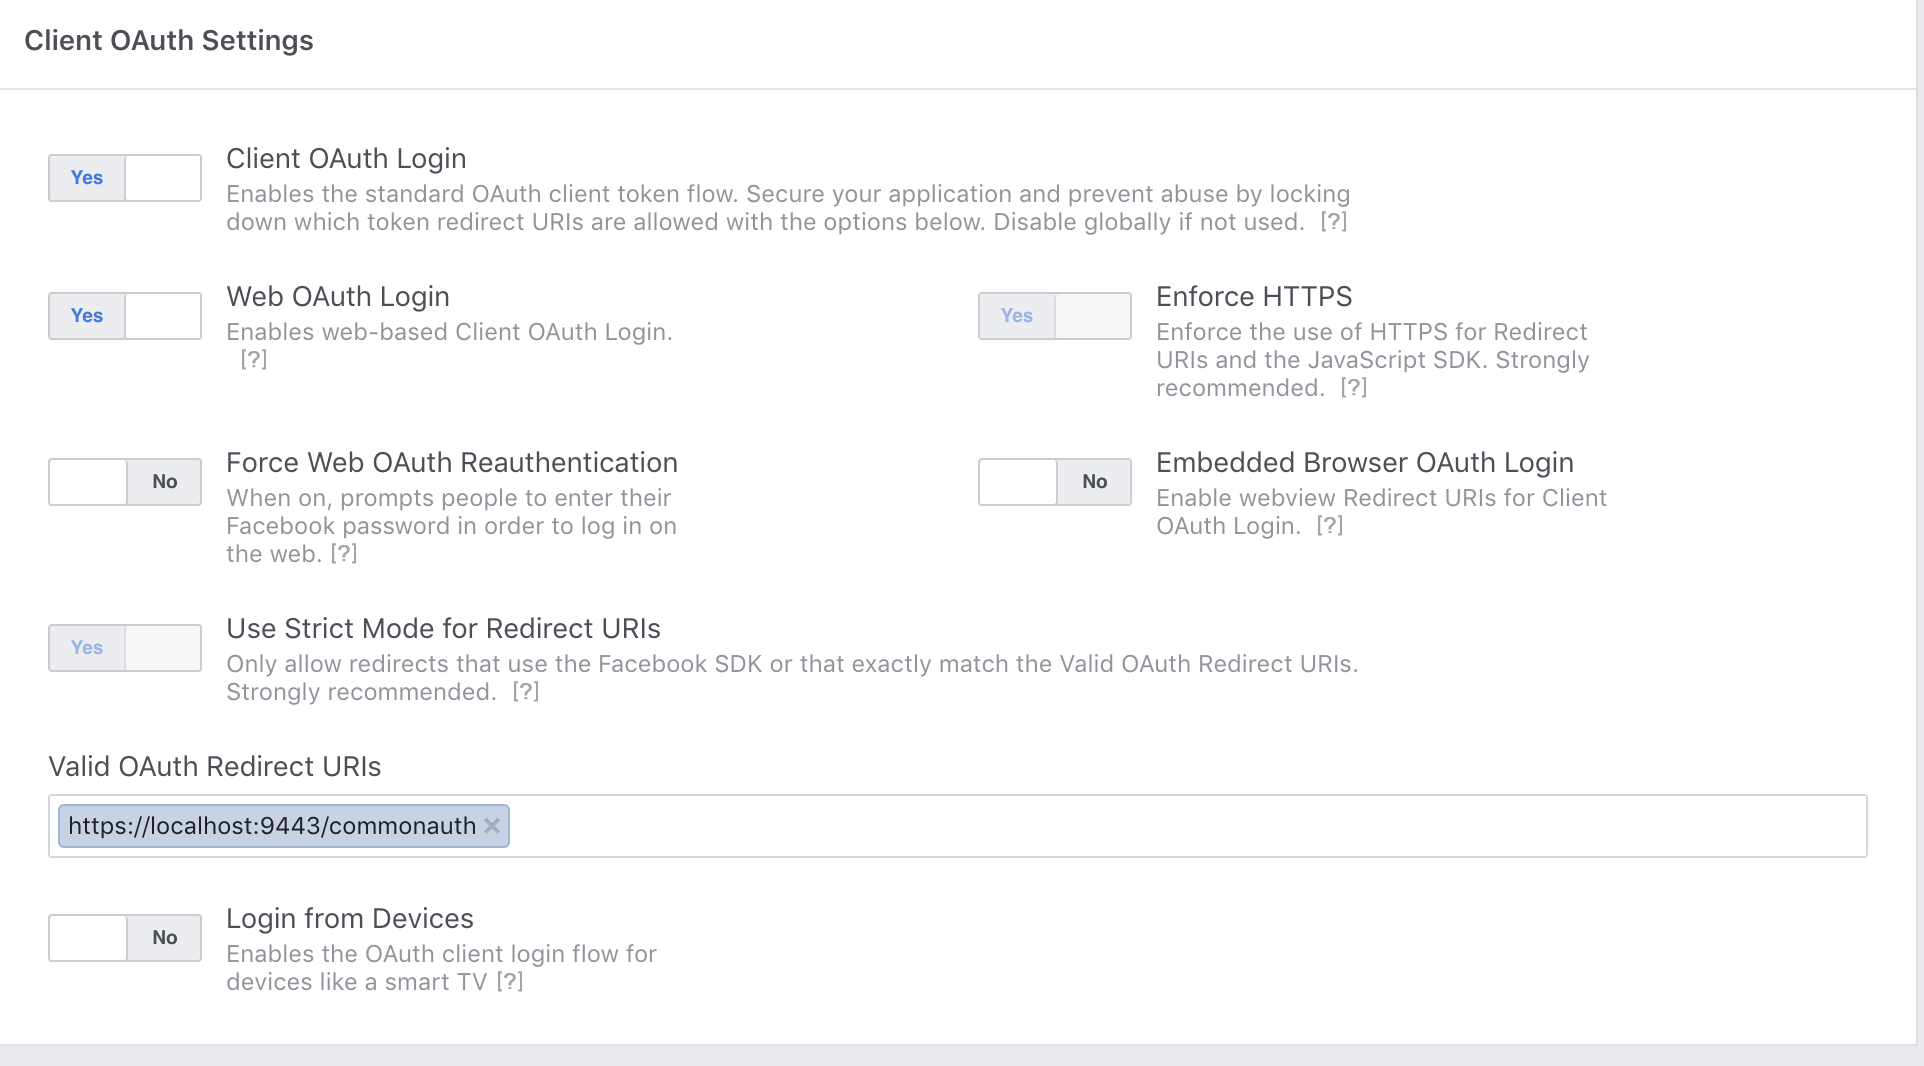
You can configure the Client OAuth Settings on the window that appears.
-
Set Client OAuth Login to Yes.
-
Set Web OAuth Login to Yes.
-
Enter
https://<IS_HOST>:<IS_PORT>/commonauth.as the value for Valid OAuth redirect URIs.
-
-
Click Save Changes.
-
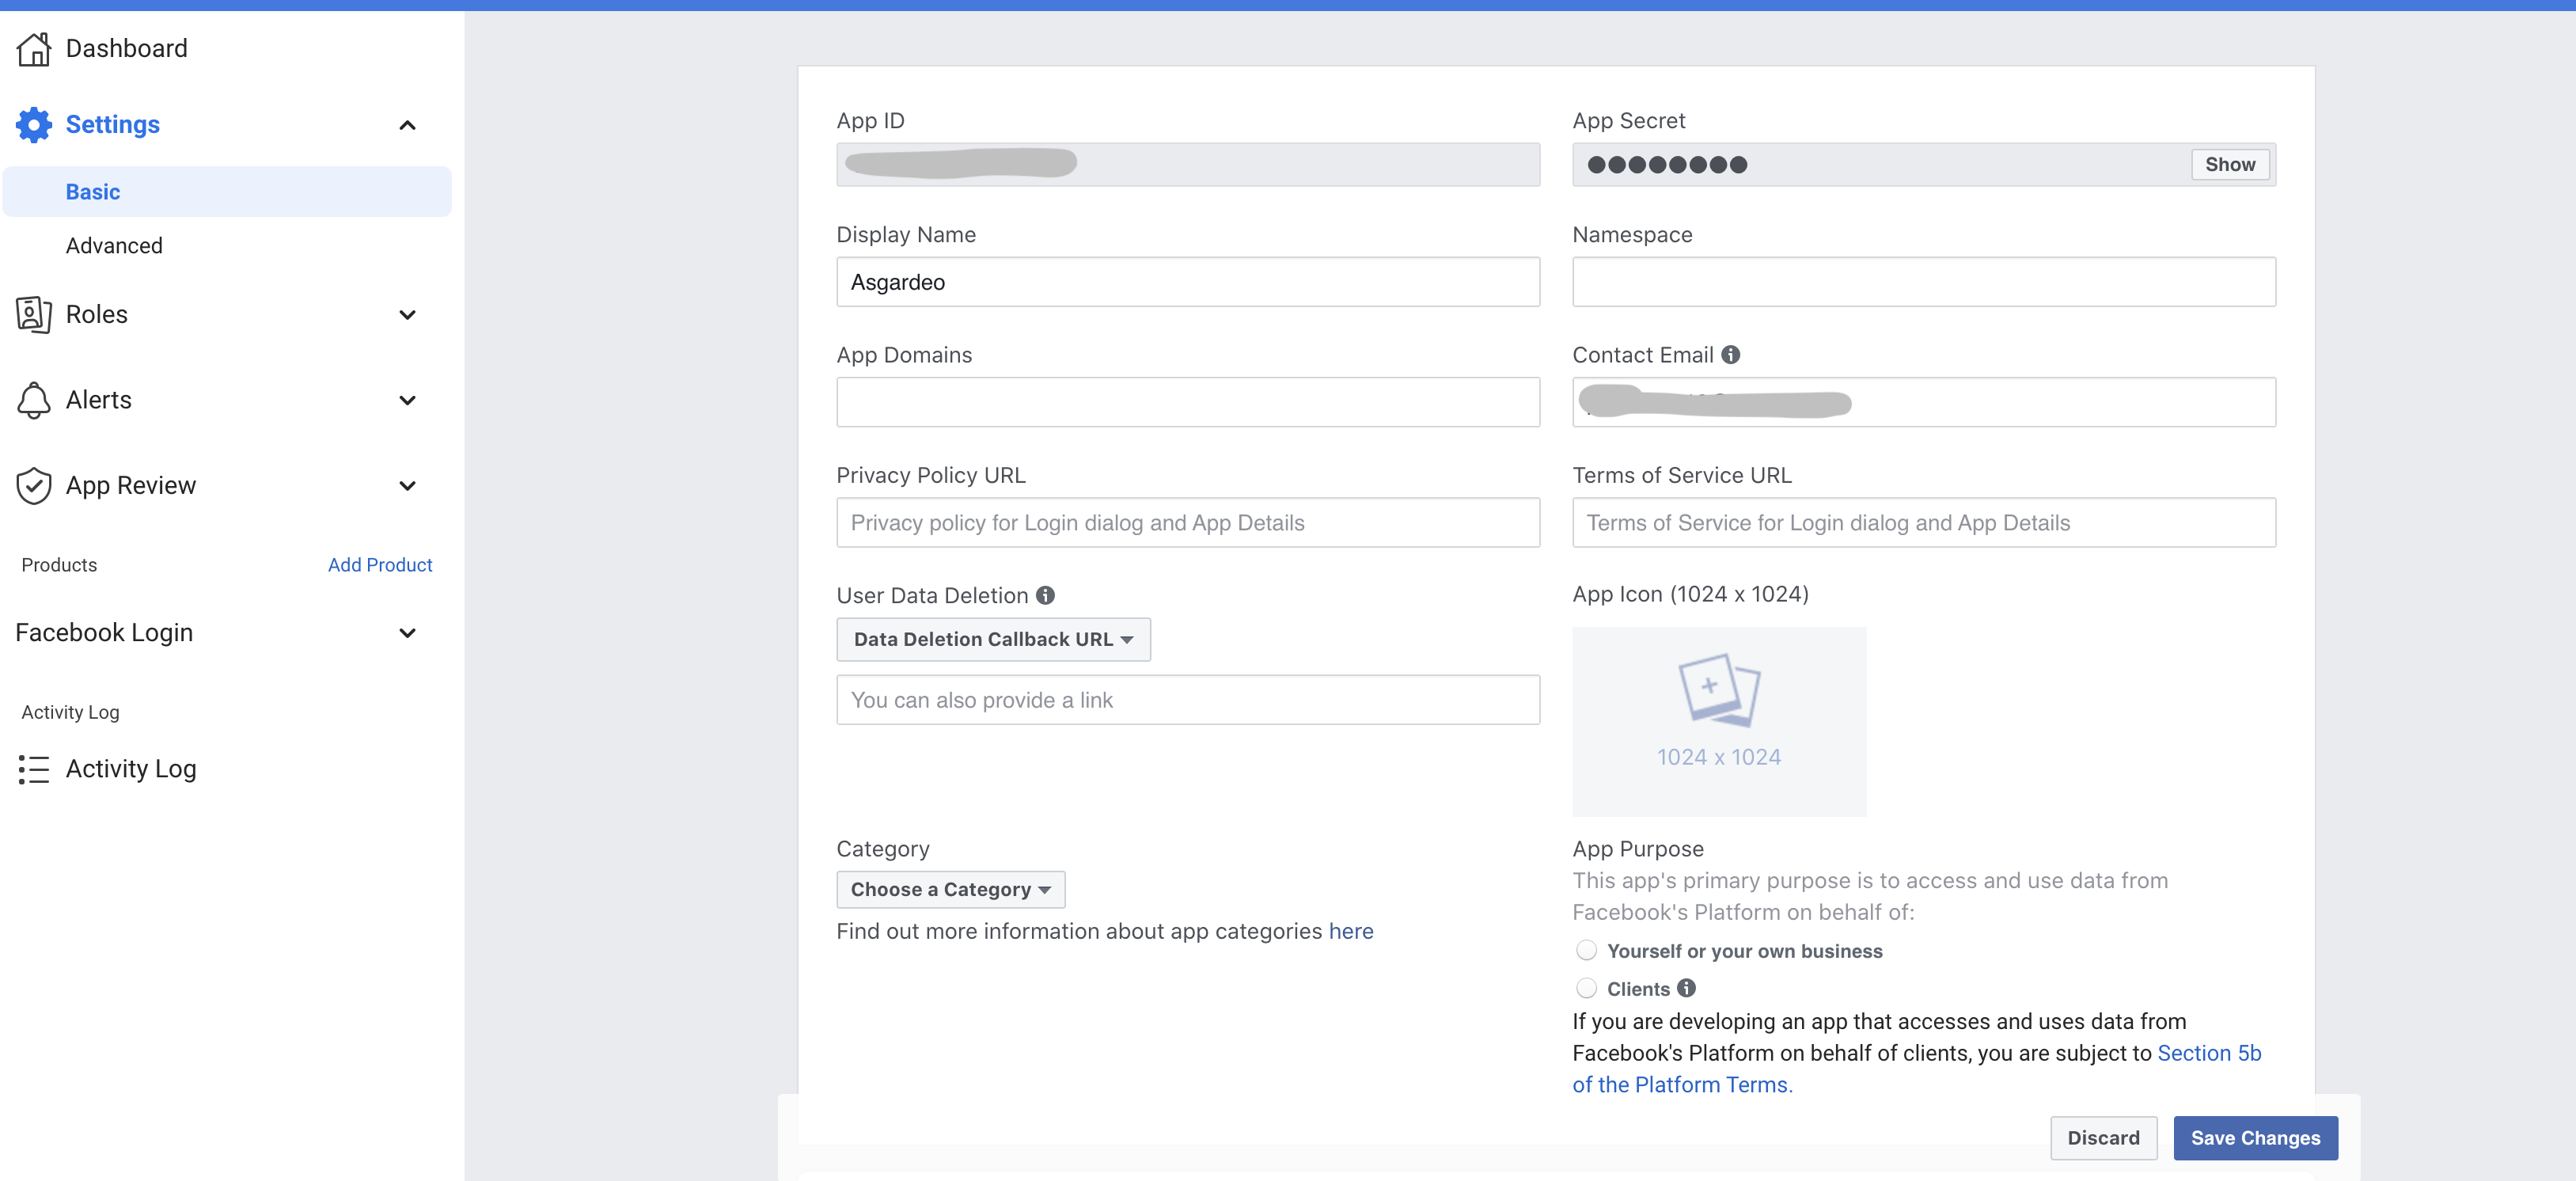
On the main panel, go to Settings > Basic and take note of the App ID and App Secret.
Now you have finished configuring Facebook as an Identity Provider.
About accessing the app
The app is not available to the general public yet. To make the app available to every Facebook user, you have to submit the app for review. After a review, Facebook makes the app available to every Facebook user. You can find more information on the review process by clicking on App Review in the left navigation menu of your app's dashboard.
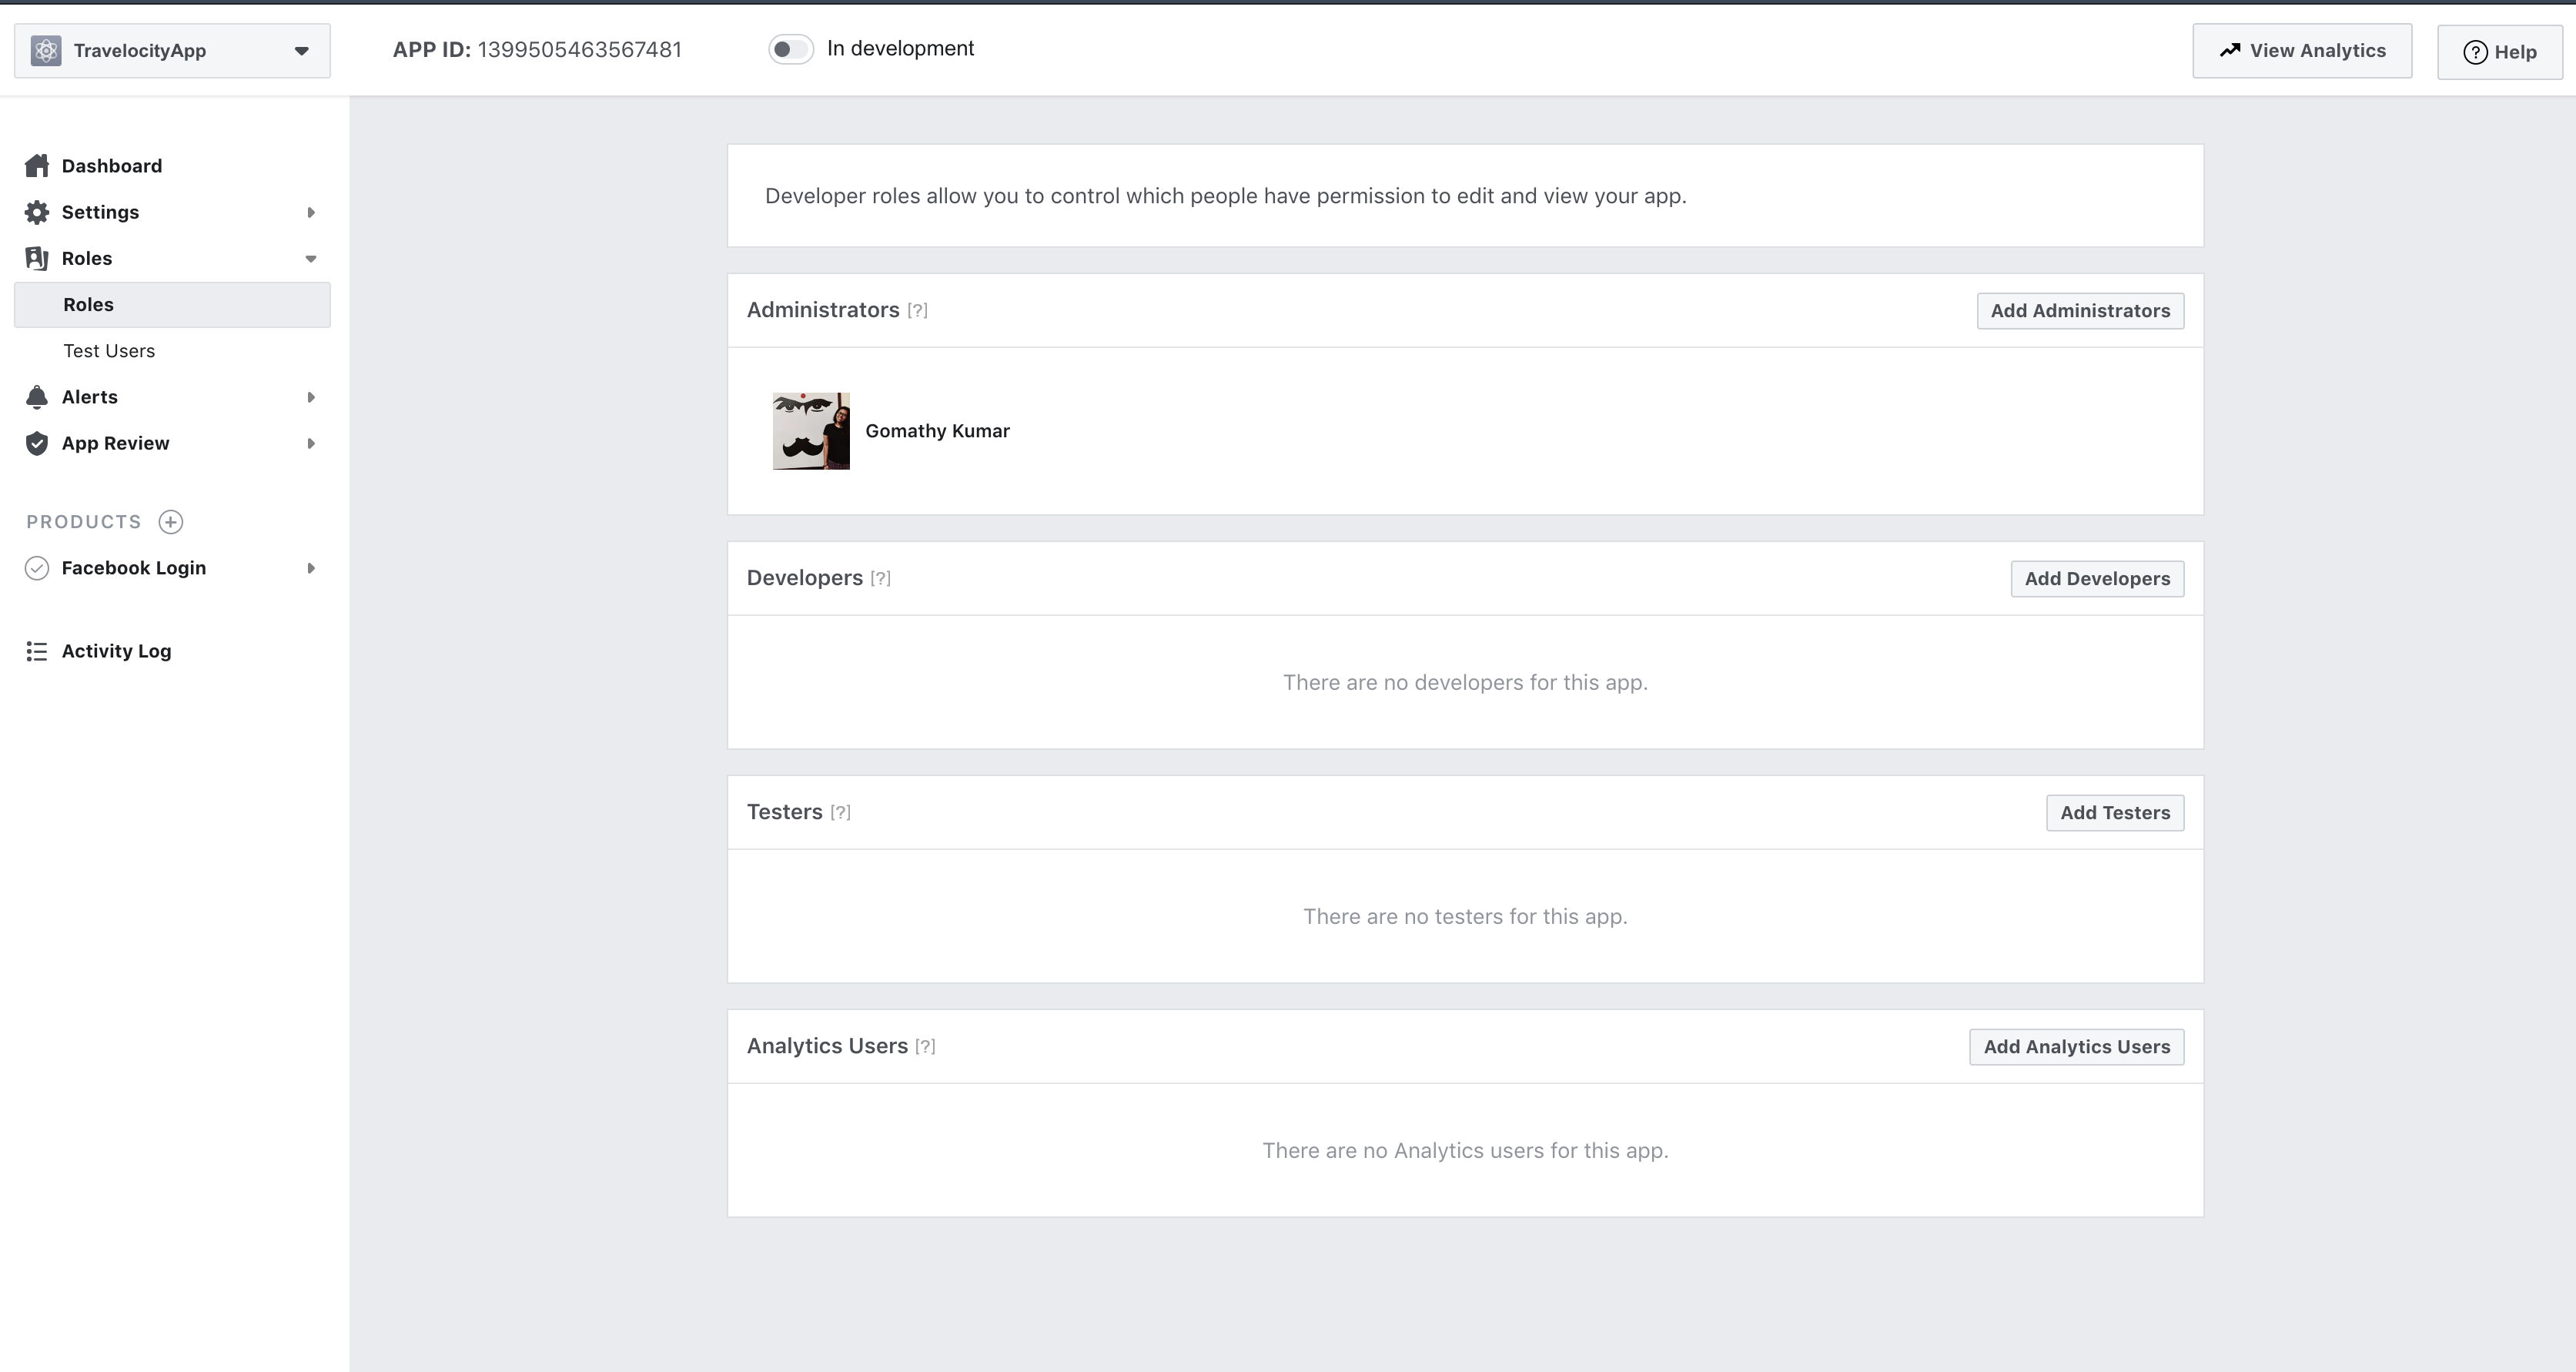
The review process may take some time, so for the purposes of this sample, you can specify some Facebook users as Developers or Testers. Only the users specified here can use this app to log in with Facebook until the app goes public. To do this, click on Roles in the left navigation menu of the dashboard and specify the required Facebook users as Developers or Testers.
Register an identity provider
-
Log in to the Management Console(
https://<IS_HOST>:<PORT>/carbon) using admin/admin credentials. -
Navigate to Main > Identity > Identity Providers > Add.
-
Enter an Identity Provider Name, Display Name, and Description.
-
Go to Facebook Configuration under Federated Authenticators.
-
Enter the following values in the form that appears:
Field Description Sample Value Client Id This refers to the App ID you received from the Facebook app you created.
Don't know the client ID? See more information
- Go to https://developers.facebook.com/ and log in using your Facebook credentials.
- Click on your app from the My Apps drop-down list.
You are navigated to the Dashboard of the application. Note down the App ID and the App secret.
.
<Application ID of the Facebook App>
Client Secret This refers to the App Secret you received from the Facebook app you created. <App Secret of the Facebook App> Scope Defines the permission to access particular information from a Facebook profile. See the Permissions Reference for a list of the different permission groups in Facebook APIs. email User Information Fields These are the claims related to the user account on Facebook. MWARE IAM requests these fields from Facebook when a user is authenticated with Facebook through the IS. See public_profile permission for more information about these fields. id,name,gender,email,first_name,last_name,age_range,link Callback Url This is the URL to which the browser should be redirected after the authentication is successful. This should be the commonauth endpoint of Identity server. https://localhost:9443/commonauth 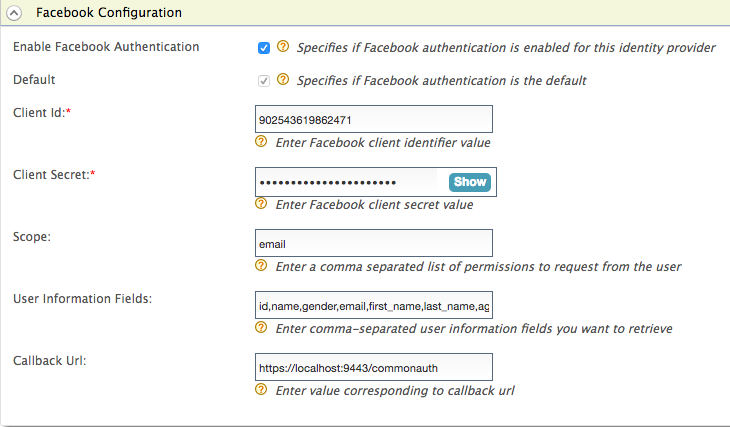
-
Select both checkboxes to Enable Facebook Authenticator and make it the Default.
-
Click Register.
You have now added the identity provider.
Configure the service provider
To register your application as a service provider in the MWARE IAM:
-
Log in to the MWARE IAM Management Console using administrator credentials.
-
Go to Main > Identity > Service Providers > Add.
-
Enter a Service Provider Name. Optionally, enter a Description.
-
Click Register.
-
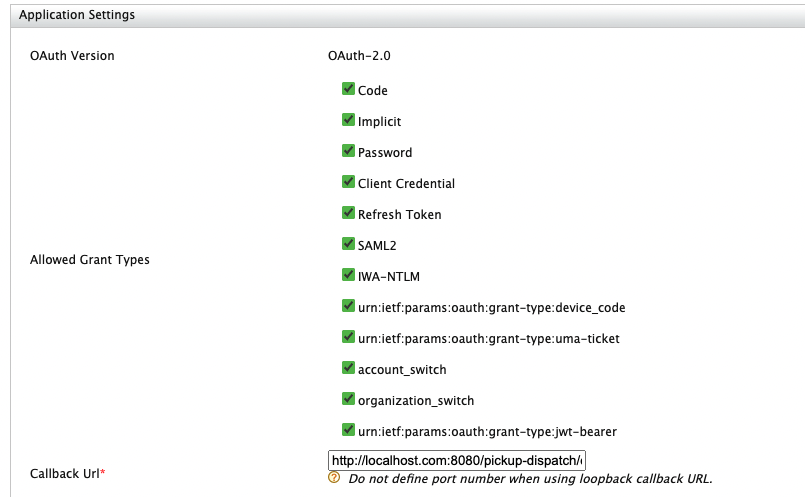
In the Inbound Authentication Configuration section, click Configure under the OAuth/OpenIDConnect Configuration section and set the configurations as required.
-
Configure the Callback URL of the sample application (http://localhost.com:8080/pickup-dispatch/oauth2client).
-
Keep the other configurations as default and click on Add
-
Click Register. Now you will be sent back to the Service Providers page.
-
Take a copy of the OAuth Client Key and the OAuth Client Secret for later usages

-
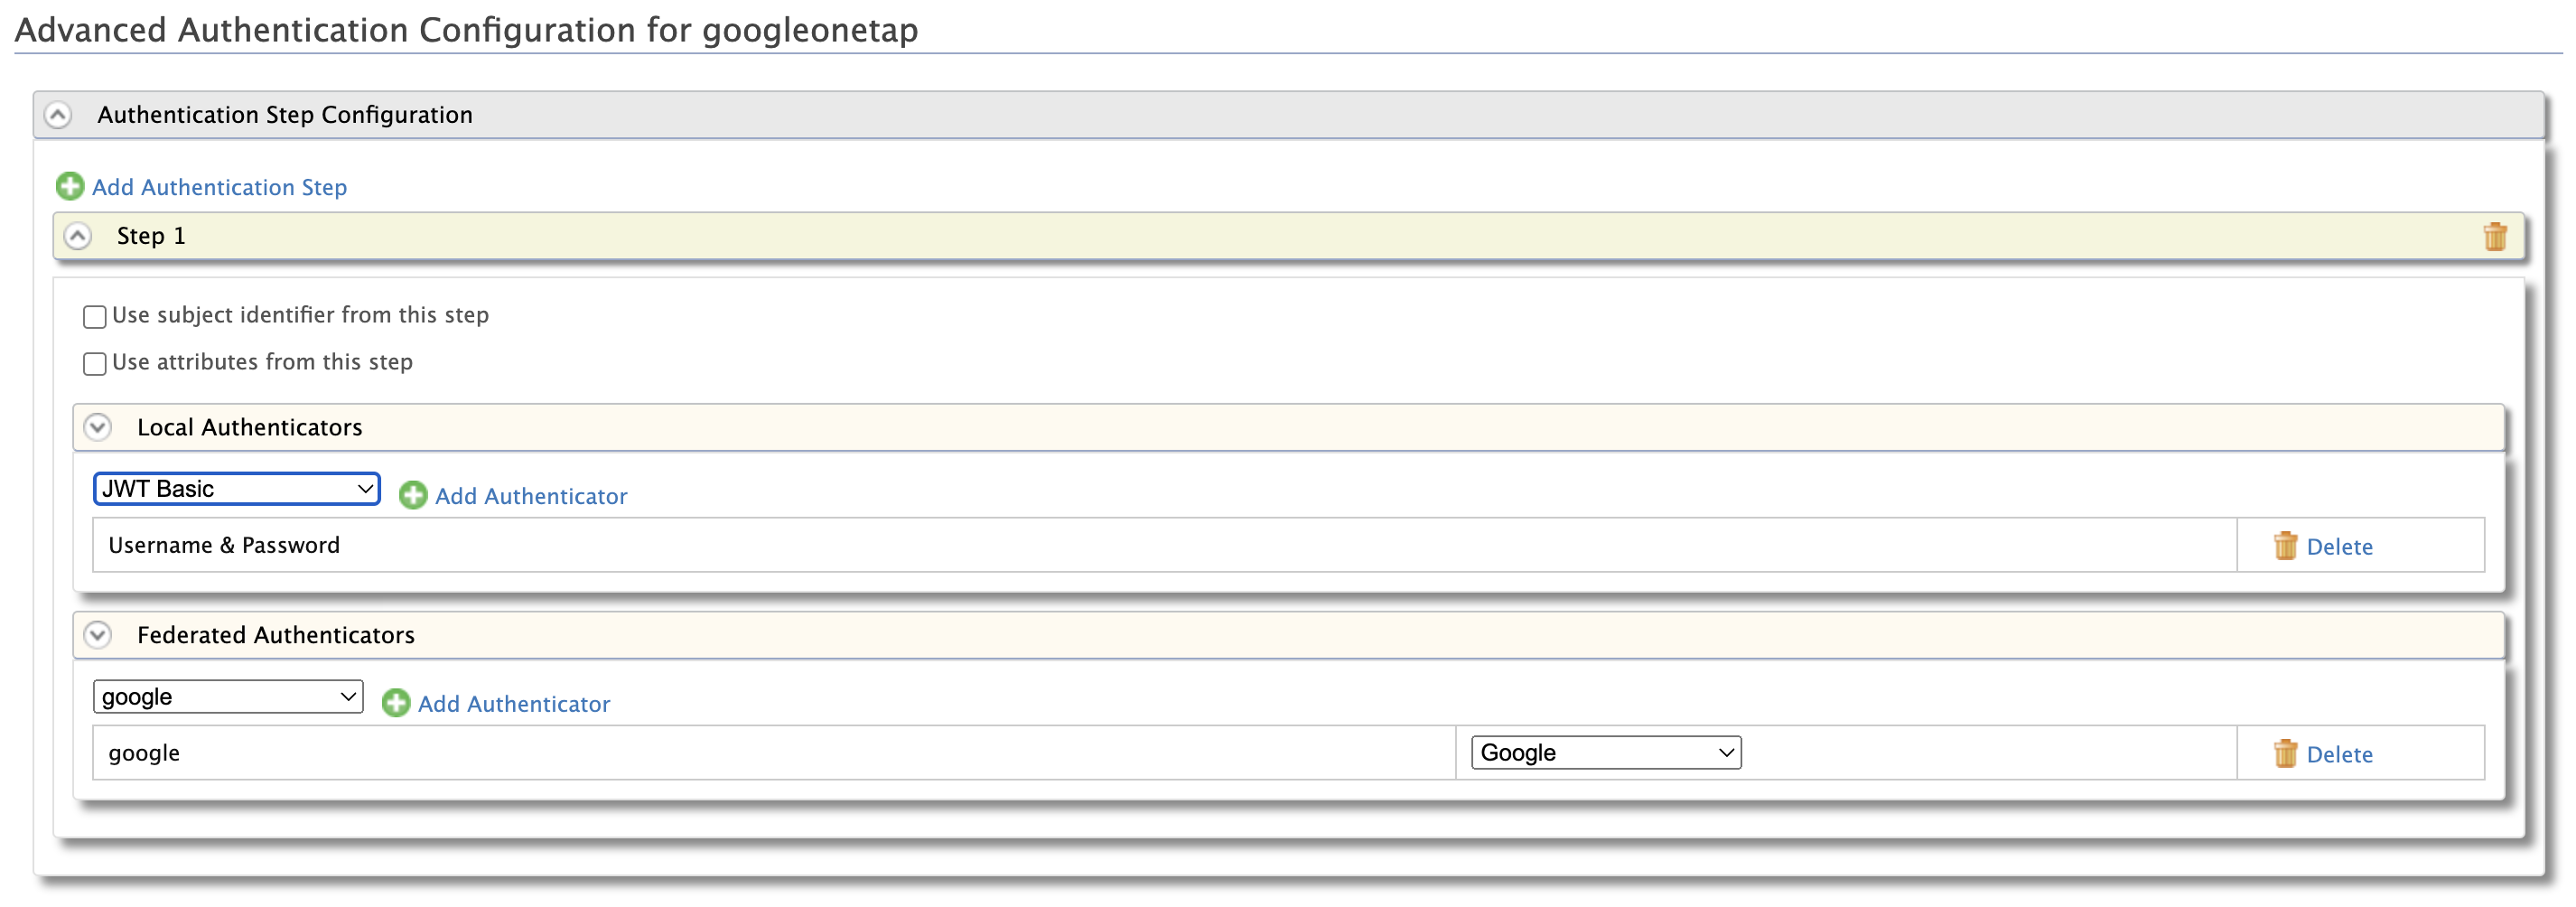
Go to the Local and Outbound Authentication Configuration section.
-
For Authentication Type, select the Federated Authentication radio button and select the Identity Provider you created from the dropdown list under Federated Authentication.
-
Click Update to save the changes.
You have now added and configured the service provider.
Note
The default client-truststore.jks found in the
<IS_HOME>/repository/resources/security/ directory
contains the Facebook certificate by default.
Related topics
For more information on SSO, see Single Sign-On.
Configure claim mapping
Enable FB claims for MWARE IAM
All the basic information of a user/application is stored in the form of claims. But for the same information, different Identity Providers(IdP) have different claims. Therefore, there should be a proper mechanism to map those claims within Identity Providers.
Here, we are authenticating the service provider application using facebook IDP. Therefore we need to map FaceBook claims with our WSO2 IDP claims.
-
In the Identity section under the Main tab, click List under Identity Providers.
-
Click Edit to edit the facebook identity provider you created.
-
Under Claim Configuration, go to Basic Claim Configuration.
-
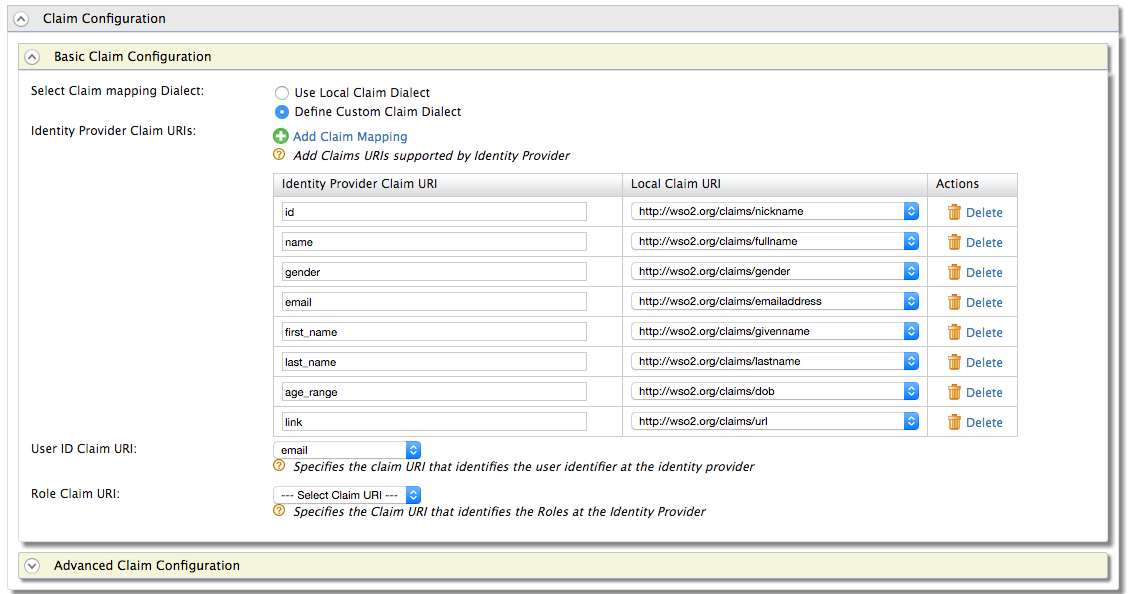
Select the Define Custom Claim Dialect option under Select Claim mapping Dialect.
-
Click Add Claim Mapping. The following screen will be displayed.

-
Now add custom claim mappings as follows.
-
You can retrieve all the public information of the user and the email address. The following are some common attribute names.
- id
- name
- first_name
- last_name
- link
- gender
- locale
- age_range
More information is available from the following link: https://developers.facebook.com/docs/facebook-login/permissions/v2.0
You can map these attributes to any Local Claim URI that is suitable.
-
From the receiving claims, you can select one claim as the user identifier for that particular identity provider. You can configure this through User ID Claim URI (e.g., email).
- Click Update to save changes.
Enable claims for service provider (optional)
Generally, the service providers need some information from the Identity Provider side after the authentication process in order to provide their service. To help this process we need to configure the necessary claims on the service provider side.
For that follow the below steps:
- In the Identity section under the Main tab, click List under Service Providers.
- Click Edit to edit the service provider created previously.
- Go to Claim Configuration.
-
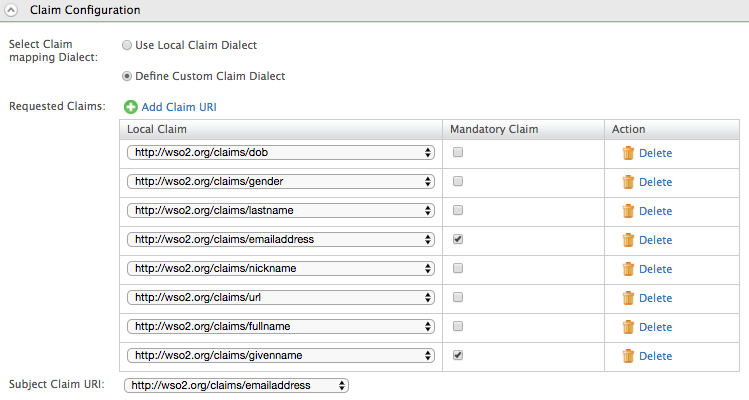
Click on Add Claim URI under Requested Claims to add the requested claims as follows. Here you should add the claims you mapped in the Identity Provider claim configuration. Select the Mandatory Claim checkbox for any claims that are mandatory.
Do only,
If the service provider needs any claims to be used after authentication process, the SP can request those claims from IDP as " Requested Claims".
Info
Here, the claims which are marked as mandatory are requested by the service provider from the identity provider. If they are not available, the user will be redirected to a different page to request those mandatory claim values from the user as they are mandatory.
-
Subject Claim URI is the unique claim which we can use to identify a service provider. Therefore, select a suitable claim for the Subject Claim URI such that it will become a unique identifier for the service provider.
-
Click Update to save changes.
Try it
You have successfully configured facebook as your federated authenticator. Now, when you try to log in to your application, it should redirect to the Facebook login page. On successful authentication with your Facebook credentials, you will be able to access your application.
Set up the sample app
-
Download Apache Tomcat 9.x from here and install. Tomcat server installation location will be referred as
<TOMCAT_HOME>later in this guide. -
It is recommended that you use a hostname that is not
localhostto avoid browser errors. Modify the/etc/hostsentry in your machine to reflect this. Note thatwso2is.localis used in this documentation as an example, but you must modify this when configuring the authenticators or connectors with this sample application. -
Download the sample from GitHub.
- Navigate to MWARE IAM Samples.
- Download the
pickup-dispatch.warfile from the latest release assets.
Deploy the sample app
Deploy this sample web app on a web container.
-
Copy the
pickup-dispatch.warfile into thewebappsfolder. For example,<TOMCAT_HOME>/apache-tomcat-<version>/webapps -
Open a terminal window and add the following entry to the
/etc/hostsfile of your machine to configure the hostname.127.0.0.1 wso2is.local 127.0.0.1 localhost.comWhy is this step needed?
Some browsers do not allow you to create cookies for a naked hostname, such as
localhost. Cookies are required when working with SSO . Therefore, to ensure that the SSO capabilities work as expected in this tutorial, you need to configure theetc/hostfile as explained in this step.The
etc/hostfile is a read-only file. Therefore, you won't be able to edit it by opening the file via a text editor. Instead, edit the file using the terminal commands.
For example, use the following command if you are working on a Mac/Linux environment.sudo nano /etc/hosts -
Open the
dispatch.propertiesfile found in the<TOMCAT_HOME>/webapps/pickup-dispatch/WEB-INF/classesdirectory and edit the consumerKey and consumerSecret with the values obtained from the OAuth configuration. -
Restart the Tomcat server.
Log in
-
To test the sample, go to the following URL:
http://<TOMCAT_HOST>:<TOMCAT_PORT>/pickup-dispatch.
For example.http://localhost.com:8080/pickup-dispatch
-
Click the LOGIN button.
-
You are redirected to the Facebook Login page. Enter your Facebook credentials and you will be taken to the home page of the pickup-dispatch app.
Related topics
- See the following topics for samples of configuring Facebook for federated authentication: