Configure OIDC Federated IdP-Initiated Logout
MWARE IAM handles logout requests from OIDC federated IdPs. When an OIDC
back-channel logout request is received from the OIDC federated IdP to the back-channel logout endpoint of MWARE IAM (https://<hostname>:<port>/identity/oidc/slo), MWARE IAM processes the request, terminates the sessions of the particular user, and then responds to the identity provider.
Learn more about OpenID Connect back-channel logout.
Scenario
Consider the scenario given below. MWARE IAM and Application2 are configured as service providers in the OIDC provider. The OIDC provider is configured as an identity provider and Application1 is configured as a service provider in MWARE IAM.
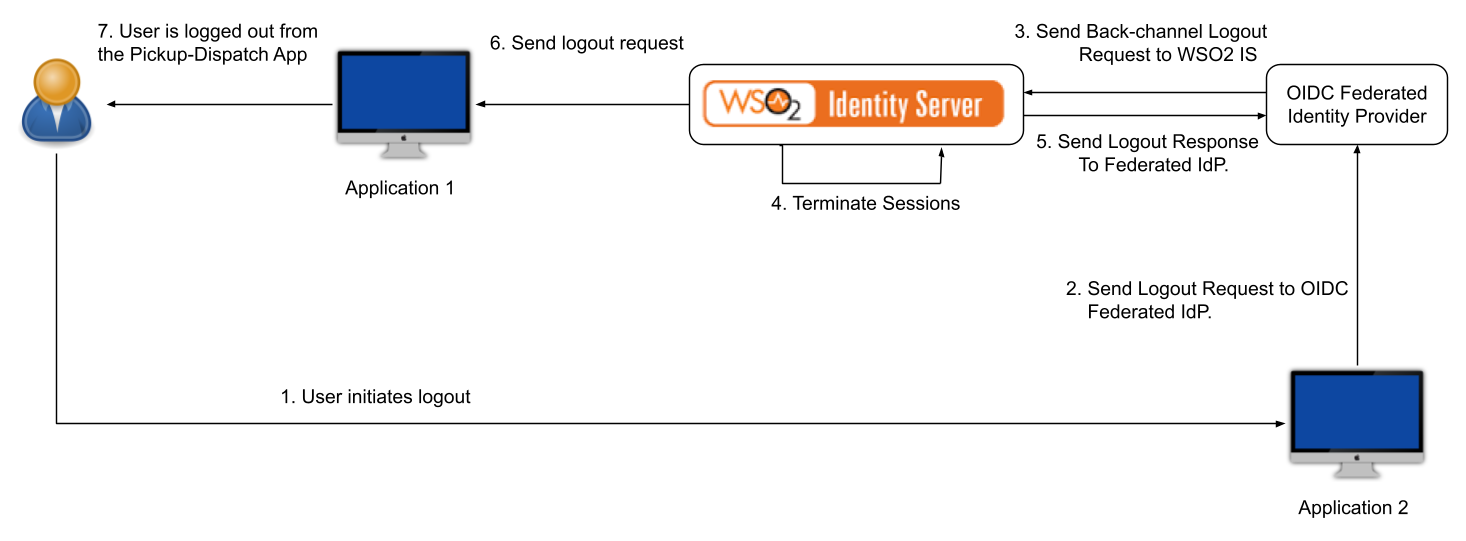
The flow is as follows:
- User initiates the logout from Application2.
- The logout request is sent to the federated OIDC provider.
- The federated OIDC provider handles the request and propagates the logout request to MWARE IAM.
- After receiving the logout request from the federated IdP, MWARE IAM processes the request and terminates the session.
- MWARE IAM then sends back a logout response to the OIDC provider.
- Since the session is terminated on MWARE IAM, the logout request is propagated to all the connected relying parties (RPs).
- User is logged out from Application1.
Note
If logout is successful in MWARE IAM, it will respond with 200 OK. If there are server-side errors or client
errors (e.g., claim validation fails), it will respond with Bad Request or Internal Server Error.
Set up
To try this out, let's configure two MWARE IAMs as the primary IdP (MWARE IAM 1) and the federated IdP (MWARE IAM 2). Let's configure two web applications, Pickup-Dispatch and Pickup-Manager as service providers in the primary IdP and the federated IdP respectively.
Prerequisites
- Set up two instances of MWARE IAM.
-
Set a port offset for MWARE IAM 2 so that the two servers can run on the same computer.
Info
Let's have the primary identity server (MWARE IAM 1) on port 9443 and the federated IdP (MWARE IAM 2) on port 9444.
-
Since there can be issues with cookies when the same hostname is configured for both MWARE IAMs (primary and federated), you need to configure different hostnames for both servers.
Info
Change the hostname of the federated IdP (MWARE IAM 2). In this guide, the hostname of the federated IdP is configured as
localhost.com.
Let's get started!
Register the primary IdP in the federated IdP
The primary identity provider (MWARE IAM 1) should first be registered in the federated IdP (MWARE IAM 2) as a service provider.
- Start the federated IdP (MWARE IAM 2).
- Sign in to the Management Console using admin credentials.
- Go to Main > Identity > Service Providers and click Add.
- Enter
Primary ISas the service provider name and click Register. - Expand Inbound Authentication Configuration > OAuth2/OpenID Connect Configuration and click Configure.
-
Enter the following value as the Callback URL:
https://localhost:9443/commonauth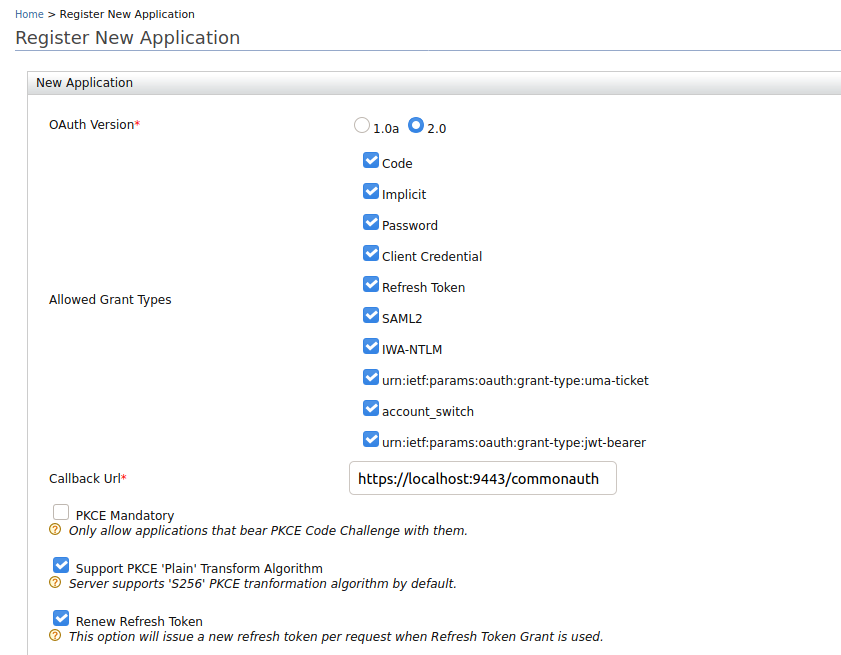
-
Select the Enable OIDC Backchannel Logout checkbox and add
https://localhost:9443/identity/oidc/sloas the Backchannel Logout Url.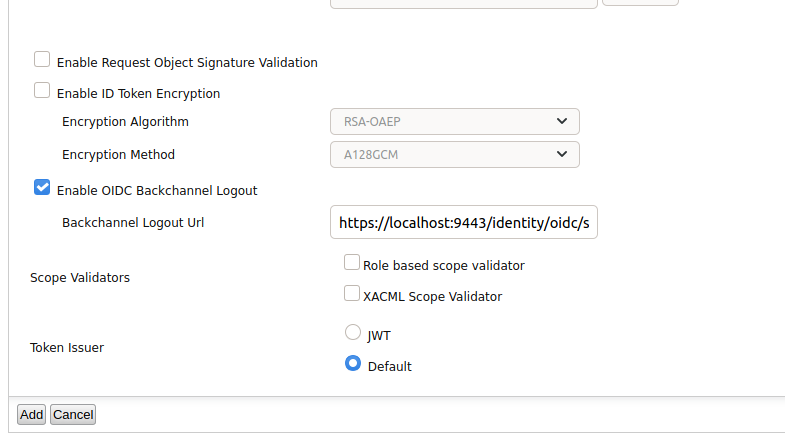
-
Click Add to complete the registration.
Info
Note the OAuth Client Key and Client Secret that is displayed. You will need these values later when you onboard MWARE IAM 2 as a federated IdP in the primary IdP (MWARE IAM 1).
Configure the federated IdP in the primary IdP
The federated IdP (MWARE IAM 2) should now be registered in the primary IdP (MWARE IAM 1) as an identity provider.
- Start the primary IdP (MWARE IAM 1).
- Sign in to the Management Console using admin credentials.
- Go to Main > Identity > Identity Providers and click Add.
- Enter
Federated IdPas the name of the identity provider. -
Specify the federated IdP's certificate type using one of the following options:
Info
The signature of the logout token is validated using either the registered JWKS URI or the certificate uploaded to the relevant identity provider.
-
Select Use IDP JWKS endpoint and add
https://localhost.com:9444/oauth2/jwksas the JWKS uri of the federated IdP's JWKS endpoint.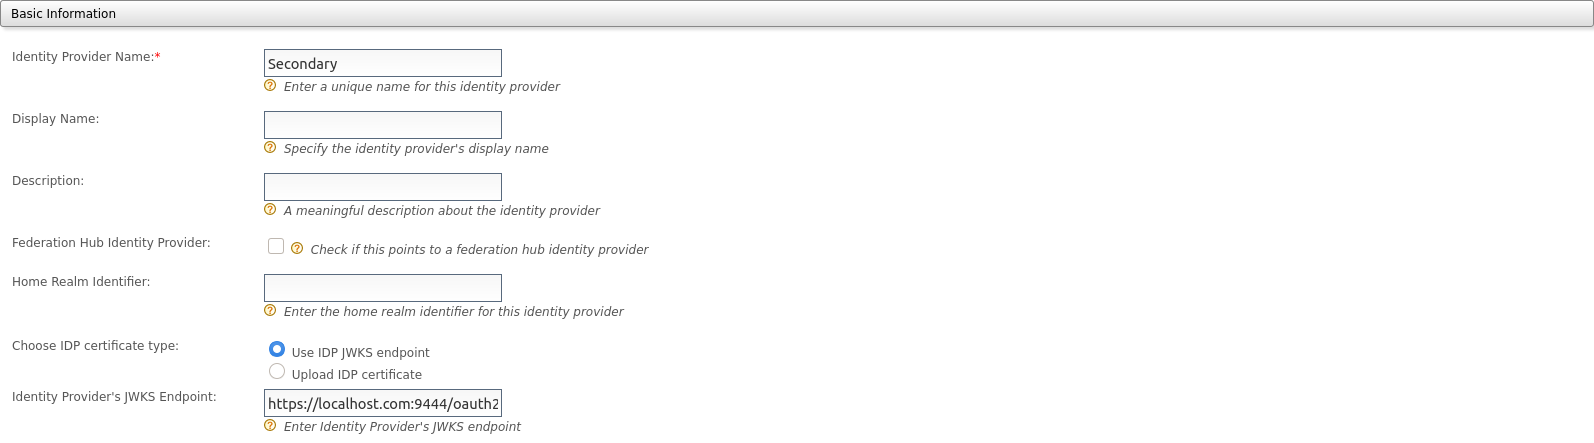
-
Alternatively, select Upload IDP certificate and upload the certificate of the federated IdP.
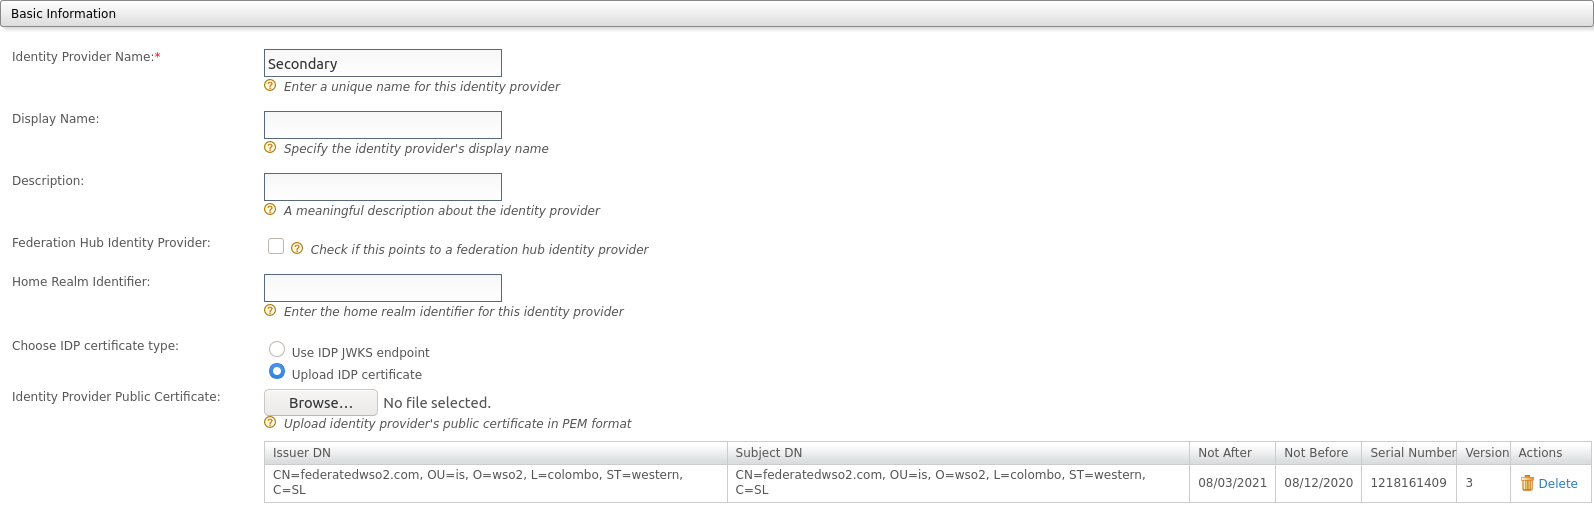
-
-
Add
https://localhost:9444/oauth2/tokenas the Identity Provider's Issuer Name.
Note
The issuer name of the identity provider registered in the primary IdP should be the same as the Identity Provider Entity ID of the resident IdP configuration in the federated IdP (MWARE IAM 2). Go to Identity Providers > Resident > Inbound Authentication Configuration > OAuth2/OpenID Connect Configuration in the federated IdP to find this value.
-
Go to Federated Authenticators, expand OAuth2/OpenID Connect Configuration, and enter the following values:
Parameter Value Enable OAuth2/OpenIDConnect Select this checkbox to specify that OAuth2/OpenID Connect is enabled for this identity provider Client Id The client ID generated when the primary IdP (MWARE IAM 1) was registered in the federated IdP. Client Secret The client secret generated when the primary IdP (MWARE IAM 1) was registered in the federated IdP. Authorization Endpoint URL https://localhost.com:9444/oauth2/authorizeToken Endpoint URL https://localhost.com:9444/oauth2/tokenCallback Url https://localhost:9443/commonauthUserinfo Endpoint URL https://localhost.com:9444/oauth2/userinfoLogout Endpoint URL https://localhost.com:9444/oidc/logoutAdditional Query Parameters scope=openid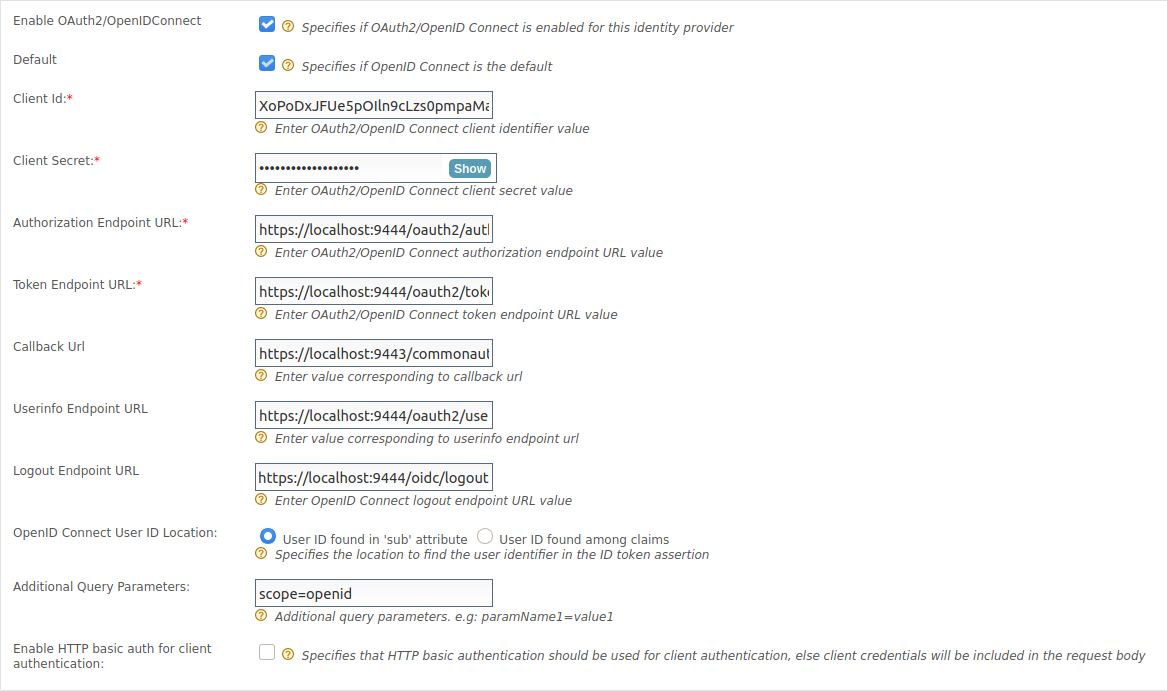
-
Click Register to complete the IdP registration.
Register a service provider for the primary IdP
Let's register an application as a service provider in the primary IdP (MWARE IAM 1).
- Sign in to the Management Console of the primary IdP using admin credentials.
- Go to Main > Identity > Service Providers and click Add.
- Enter
Pickup-Dispatchas the service provider name and click Register. - Expand Inbound Authentication Configuration > OAuth2/OpenID Connect Configuration and click Configure.
-
Enter the following value as the Callback URL:
http://wso2is.local:8080/pickup-dispatch/oauth2client -
Click Add to save the service provider.
Info
Note the OAuth Client Key and Client Secret that are displayed. You will need these values later when deploying the sample application.
Once the service provider is registered, let's add the federated IdP (MWARE IAM 2) as the service provider's sign-in method.
- Expand Local & Outbound Authentication Configuration and select Federated Authentication.
-
Select Federated IdP as the authentication type from the list.
-
Click Update to save the changes.
Register a service provider for the federated IdP
Now, let's register an application as a service provider in the federated IdP (MWARE IAM 2).
- Log in to the Management Console of the federated IdP using admin credentials.
- Go to Main > Identity > Service Providers and click Add.
- Enter
Pickup-Manageras the service provider name and click Register. - Expand Inbound Authentication Configuration > OAuth2/OpenID Connect Configuration and click Configure.
-
Enter the following value as the Callback URL:
http://localhost.com:8080/pickup-manager/oauth2client -
Click Add to save the service provider.
Info
Note the OAuth Client Key and Client Secret that are displayed. You will need these values later when deploying the sample application.
Try it out
Let's set up the sample applications and try out back-channel logout initiated by the federated IdP.
Set up Pickup Dispatch
Follow the steps given below to set up the Pickup-Dispatch application that is registered as a service provider for the primary IdP (MWARE IAM 1).
-
Download the pickup-dispatch.war sample.
-
Extract the
pickup-dispatch.warfile and open thedispatch.propertiesfile located in the<EXTRACT>/WEB-INF/classesfolder. -
Replace the
consumerKeyandconsumerSecretvalues with the OAuth Client Key and Client Secret values that were generated when you registered the service provider.
Set up Pickup Manager
Follow the steps given below to set up the Pickup-Manager application that is registered as a service provider for the federated IdP (MWARE IAM 2).
-
Download the pickup-manager.war sample.
-
Extract the
pickup-manager.warfile and open themanager.propertiesfile located in the<EXTRACT>/WEB-INF/classesfolder. -
Replace the
consumerKeyandconsumerSecretvalues with the OAuth Client Key and Client Secret values that were generated when you registered the service provider.
Deploy the samples
Next, deploy the sample web apps on a web container.
-
Download Apache Tomcat 8.x from here and install it.
Info
It is recommended that you use a hostname that is not
localhostto avoid browser errors. Modify the/etc/hostsentry in your machine to reflect this. Note thatwso2is.localis used in this documentation as an example, but you must modify this when configuring the authenticators or connectors with this sample application. -
Next, copy the extracted and modified
pickup-managerandpickup-dispatchfolders to the<TOMCAT_HOME>/webappsfolder.
You are now ready to try out back-channel logout initiated by the federated IdP.
Try logout
Once you have completed configuring MWARE IAM as instructed in the above sections, try out the flow by running the sample applications.
-
Start the Tomcat server and access the two applications (
Pickup-DispatchandPickup-Manager) on two browser pages.- Pickup-Dispatch: http://localhost.com:8080/pickup-dispatch/
- Pickup-Manager: http://localhost.com:8080/pickup-manager/
-
Log in to the
Pickup-Dispatchapplication.Info
You are redirected to the login page provided by the federated IdP (MWARE IAM 2).
-
Use your MWARE IAM credentials to log in.
Info
You will be redirected to the Pickup Dispatch application's home page.
-
Log in to the
Pickup-Managerapplication.Info
You are automatically logged in and redirected to the Pickup Manager application's home page.
-
Log out of the Pickup Manager application.
Info
You are redirected to the login page of the application.
-
Now, attempt to access the Pickup Dispatch application.
Info
Note that you are already logged out of this application as well.
Validate the OIDC back-channel logout token
The following is an example OIDC back-channel logout token.
{
"iss": "https://localhost.com:9444/oauth2/token",
"sub": "admin",
"aud": "w_Hwp05dFRwcRs_WFHv9SNwpflAa",
"iat": 1609911868,
"exp": 1609911988,
"jti": "16159e3e-c5fc-42de-b93f-b0782ab33d58",
"sid": "15043ffc-877d-4205-af41-9b107f7da38c",
"events": {
   "http://schemas.openid.net/event/backchannel-logout": {}
   }
}
Logout token validation is done according to the OIDC back-channel logout specification for the token signature and the iss, aud, iat, sub, sid, events, and nonce claims.
-
Configure “iat” claim validation
By default,
iatclaim validation is enabled andiatValidityPeriodis set as 300 seconds. To update these configurations, follow the steps given below.- Open the
deployment.tomlfile (stored in the<PRIMARY_IS_HOME>/repository/conf/folder). -
Update the configurations given below.
- The
iatValidityPeriodconfiguration should be in seconds. - If
iatclaim validation is enabled in the primary IdP (MWARE IAM 1), the token shouldn’t be issued before the specified time.
[authentication.authenticator.oidc.parameters] iatValidityPeriod = "150" [authentication.authenticator.oidc.parameters] enableIatValidation = false - The
-
Restart the primary IdP (MWARE IAM 1).
- Open the
-
Identifying the session (using
suborsidclaims)- Logout token should contain a
subclaim, asidclaim, or both. - If the logout token contains a
sidclaim, the primary IdP (MWARE IAM 1) will terminate the particular session of the user with thesidclaim. Thesidclaim in the logout token should match thesidclaim in the ID token received for the current session. - If the logout token only contains a
subclaim, the primary IdP (MWARE IAM 1) will terminate all the sessions for thatsubclaim.
- Logout token should contain a