Write a Custom OAuth2 Federated Authenticator
A custom OAuth2 authenticator can be written to authenticate a user with an external system. The external system can be
any Identity provider supporting OAuth2 including Facebook, Kakao, Naver, etc. You can use the OAuth2GenericAuthenticator
available in MWARE IAM to create custom OAuth2 authenticators.
Write a custom OAuth2 federated authenticator
-
Create a maven project for the custom OAuth2 authenticator. Refer to the following files:
- The pom.xml file used for the Custom authenticator.
- The service component class to deploy in MWARE IAM and register it as a federated authenticator.
-
The custom authenticator should be written by extending the
OAuth2GenericAuthenticatorclass. - You can find a Kakao custom authenticator here for your reference.
The important methods in the OAuth2GenericAuthenticator class are listed as follows:
| Method | Description |
|---|---|
| public String getName() | Return the name of the authenticator. |
| public String getFriendlyName() | Returns the display name for the custom authenticator. In this sample we are using “KAKAO”. |
| public String getContextIdentifier(HttpServletRequest request) | Returns a unique identifier that will map the authentication request and the response. The value returned by the invocation of the authentication request and the response should be the same. |
| public boolean canHandle(HttpServletRequest request) | Specifies whether this authenticator can handle the authentication response. |
| protected void initiateAuthenticationRequest(HttpServletRequest request,HttpServletResponse response, AuthenticationContext context) | Redirects the user to the login page in order to authenticate and in this sample, the user is redirected to the login page of the Kakao. |
| protected void processAuthenticationResponse(HttpServletRequest request,HttpServletResponse response, AuthenticationContext context) | Implements the logic of the custom federated authenticator. |
| protected void buildClaims(AuthenticationContext context, String userInfoString) | Implements the logic for extracting the subject from claims and for other claim mappings. |
Deploy the custom OAuth2 federated authenticator in MWARE IAM
To deploy the custom OAuth2 federated authenticator: 1. Open a terminal, navigate to the root of your project, and compile the service by running the following command:
mvn clean installjar file inside /target folder and paste it to the <IS_HOME>/repository/components/dropins.
Configure the Identity Server
This section guides you on how to configure the identity server to use the custom OAuth2 federated authenticator.
Configure custom OAuth2 federated authenticator
To configure the OAuth2 custom authenticator:
- Initially, register a new identity provider.
-
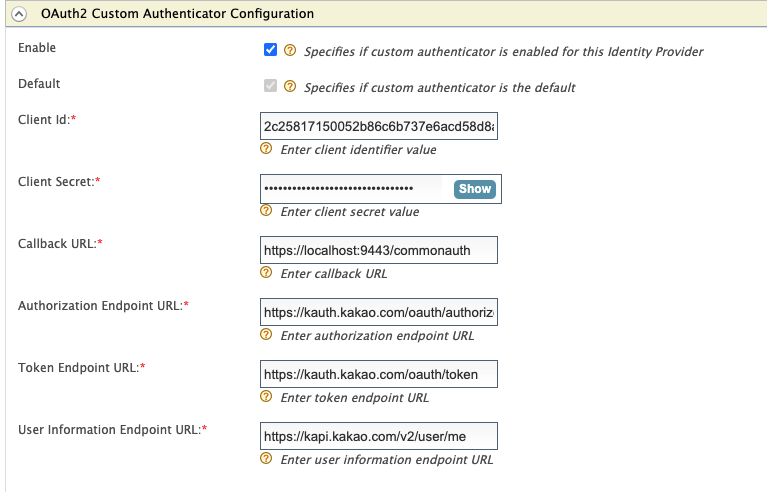
Expand Federated Authenticators > Custom OAuth2 Authenticator Configuration and configure it as follows:
- Select the Enable and Default check boxes.
- Client Id - The client ID value generated by the external OAuth2 IdP.
- Client Secret - The client secret value generated by the external OAuth2 IdP.
- Callback Url - https://localhost:9443/commonauth
- Authorization Endpoint URL - https://kauth.kakao.com/oauth/authorize
- Token Endpoint URL - https://kauth.kakao.com/oauth/token
- User Information Endpoint URL - https://kapi.kakao.com/v2/user/me
Info
Here, the Client Id and Client Secret are the values generated by the external OAuth2 IdP.
Configure the SP with the custom federated authenticator
- On the MWARE IAM Management Console, go to Main > Identity > Service Providers > Add.
- Enter a Service Provider name and click Register to add the new service provider.
- Expand Inbound Authentication Configuration > OAuth/OpenID Connect Configuration and click Configure.
- Enter
http://localhost:8080/playground2/oauth2clientas the Callback URI, and click Update. - Expand to Local & Outbound Authentication Configuration and select the configured authenticator from the Federated Authentication list.
- Click Update to save the configurations.
Try it out
- Access the playground app by using http://localhost:8080/playground2.
- This will redirect to the login page of Kakao.
- Enter the email address and password for Kakao.
You will be successfully logged into the application.
Similarly, you can write a custom authenticator to authenticate the users from different external systems.
Top